Building a USB to Mac ADB keyboard adapter
Jan 13, 2024
QMK
ADB
Mac
Keyboard
Atmega32u4
Pro Micro
Electronics
This article got some traction on Hacker News and spent most of a day on the front page; see bottom of this page for some related footnotes.
About a year ago I started a new job as a Staff Engineer with a larger FinTech. Plenty of upside, and I’m enjoying myself a lot, but the downside is that I’m obliged to work on a Mac. I kind of hate Macs. Not quite as bad as Windows, but damn I’m missing Linux in the workplace.
Note: If you plan on following in my footsteps, do note that I did all the work described here on my personal Linux machine over a weekend - it’s only the end result that I used on the actual work Mac
However, this did give me an excuse to indulge my taste for retro-computing by picking up an original Macintosh Extended Keyboard II - this beauty:
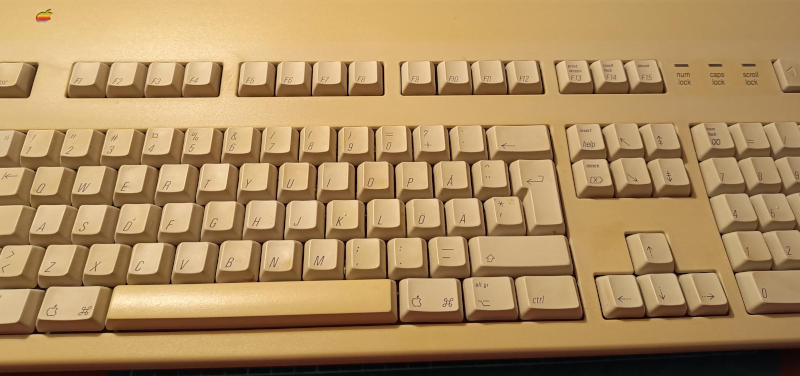
Macintosh Extended Keyboard II
Partly I chose it because it’s of the vintage that I occasionally used during my final year at university in the Mac lab - mostly while coding up a fairly hapless AI project in Macintosh Common Lisp (MCL).
Apple always did things a bit differently, so while the IBM PC derived machines had more-or-less standardised on the PS/2 based connectors, Macs had their own serial bus system for keyboards and mice. The PC stuff and the Mac stuff both used a four pin DIN connector just to ensure maximum confusion, and of course they were completely incompatible.
The nice thing about the Apple system was that you could daisy chain it - and the keyboards generally had a connector on both sides, making a rare concession to lefties who could thus connect the keyboard on the right and chain the mouse off of it on the left side of the keyboard if they chose.
Incidentally, if you were in a whimsical student mood, you could also chain all of the keyboards on a row of machines end to end resulting in five or six machines completely unconnected from their keyboard and the one at the end taking any and all input from the neighbours. Ok, it was kind of a dick move, but in a lab full of IT students it wasn’t too mean a trick and nobody was stymied for long.
The old connection system was called “Apple Desktop Bus” (ADB). These days Macs are firmly USB oriented for their minor peripherals, so getting an old-skool keyboard to talk to a spiffy modern M1 Mac requires a suitable adapter. There are a handful of commercially available adapters, but it’s more fun to build something and it’s the kind of project that’s actually within reach of even my meagre electronics skills.
The QMK Project is the basis for the device that I therefore built - it’s better known as a basis for building custom keyboards, but it also contains some code for building adapters. The wiring required is well documented in the README for the source folder for the adapter logic: https://github.com/qmk/qmk_firmware/tree/master/keyboards/converter/adb_usb
The ASCII art wiring diagram stolen from that is:
ADB Socket from front:

  ,--_--.
 / o4 3o \      1: DATA
| o2   1o |     2: Power SW
 -  ===  -      3: VCC
  `-___-'       4: GND


  Keyboard       Converter
               ,------.
5V------+------|VCC   |
        |      |      |
       [R]     |      |
        |      |      |
Signal--+------|PD0   |
               |      |
GND------------|GND   |
               `------'
R: 1K Ohm resistor
I think I ended up using a 4.7KΩ resistor - but I can’t remember why. Probably I saw it in some online instructions somewhere, but I’ve lost it now - my apologies to whichever reference I’m thus failing to cite here.
I picked up a cheap clone of a Pro Micro board on Amazon. The original and the clone are both based around the atmega32u4 and the pinouts are identical. The circuit consists of the board, a single resistor, and the DIN connector, so there’s really very little to do.
The one “gotcha” worth mentioning is that the PD0 pin mentioned in the QMK documentation
corresponds to the D3 pin on the processor board, not the D0 pin as you might (I did)
assume initially.
Burning the firmware was actually (marginally) harder than soldering it all together! However you should ignore the instructions on the README for the adapter logic - that’s a bit outdated and seems to be left over from the original TMK origin of the code. Instead, follow the instructions outlined in the main QMK documentation:
After cloning the QMK repository locally, the first
steps were actually to install a qmk python command independently of that:
python3 -m pip install --user qmk
export PATH=$PATH:$HOME/.local/bin
qmk setup
Note in the above that the .local/bin directory is not, on Ubuntu, in your path by default due to
a long-standing Ubuntu bug. Running the qmk setup command will prompt you to install all
the pre-requisites necessary for building the actual adapter logic.
With that complete you’re good to go to build the adapter-specific code from the root of the checked out QMK repository:
qmk compile -kb converter/adb_usb -km default
The default here is the keyboard map - you can alternatively build and compile
in any weird mapping you choose.
The result of the build should be a file converter_adb_usb_rev1_default.hex and
the next task is to get that loaded into the microcontroller.
Happily this requires no special steps and everything is auto-detected with the following command:
qmk flash converter_adb_usb_rev1_default.hex
With the adapter logic flashed onto the microcontroller and everything wired up, you should
see the adapter show up in the USB device list as QMK ADB to USB Keyboard Converter:
dcminter@kanelbulle:~$ lsusb
Bus 002 Device 010: ID 413c:81b6 Dell Computer Corp. DW5811e Snapdragon™ X7 LTE
Bus 002 Device 001: ID 1d6b:0003 Linux Foundation 3.0 root hub
Bus 001 Device 005: ID feed:0adb QMK ADB to USB Keyboard Converter
Bus 001 Device 003: ID 8087:0a2b Intel Corp. Bluetooth wireless interface
Bus 001 Device 002: ID 0bda:568c Realtek Semiconductor Corp. Integrated Webcam HD
Bus 001 Device 004: ID 0a5c:5834 Broadcom Corp. 5880
Bus 001 Device 001: ID 1d6b:0002 Linux Foundation 2.0 root hub
A minor gotcha to mention - I had a lot of initial trouble flashing the image, but I eventually realised that this was because the cable I was using was garbage. It came with some cheap crap audio gadget and was apparently barely good enough to use for charging and nothing else. All my issues went away when I swapped it for a good one!
I built my adapter on a bit of veroboard and I wanted to hide that away. A bit of measuring with calipers, some tinkering in Tinkercad, and sliiiightly more do-overs due to my horrible 3D design skills than I might have liked, and I had a design for a case to put it all in:
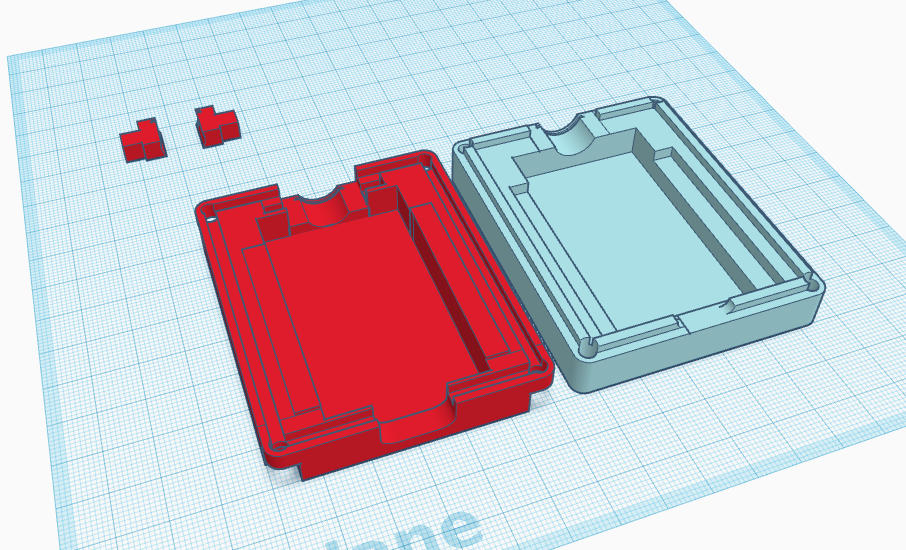
Case design in Tinkercad
I know Tinkercad is the wrong tool for the job, but it’s so quick to get started even if it ends up taking longer. I swear I will learn SolveSpace properly real soon now (tm). I did have a go at learning FreeCad a while back, but that thing is so buggy and inconsistent that TinkerCad seems like the better bet of the two!
Anyway, with the design in hand and exported as an STL file I fired up Cura, pushed it over to my 3D printer, and ran off the case
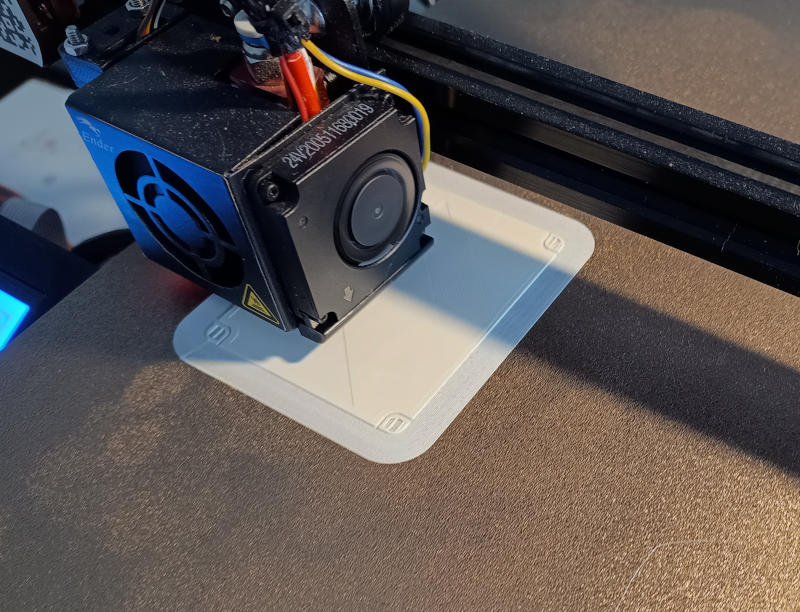
The case printing on my Ender 3 Pro
The end result was a good fit for the electronics - though I’m kicking myself for soldering the DIN adapter on first and not after I’d decided on the dimensions of the case because the wires are all the wrong length. I could unsolder and re-solder it, but it’s not quite worth the effort as it will all be hidden from the eye. Here are the innards resting in the base of the case:
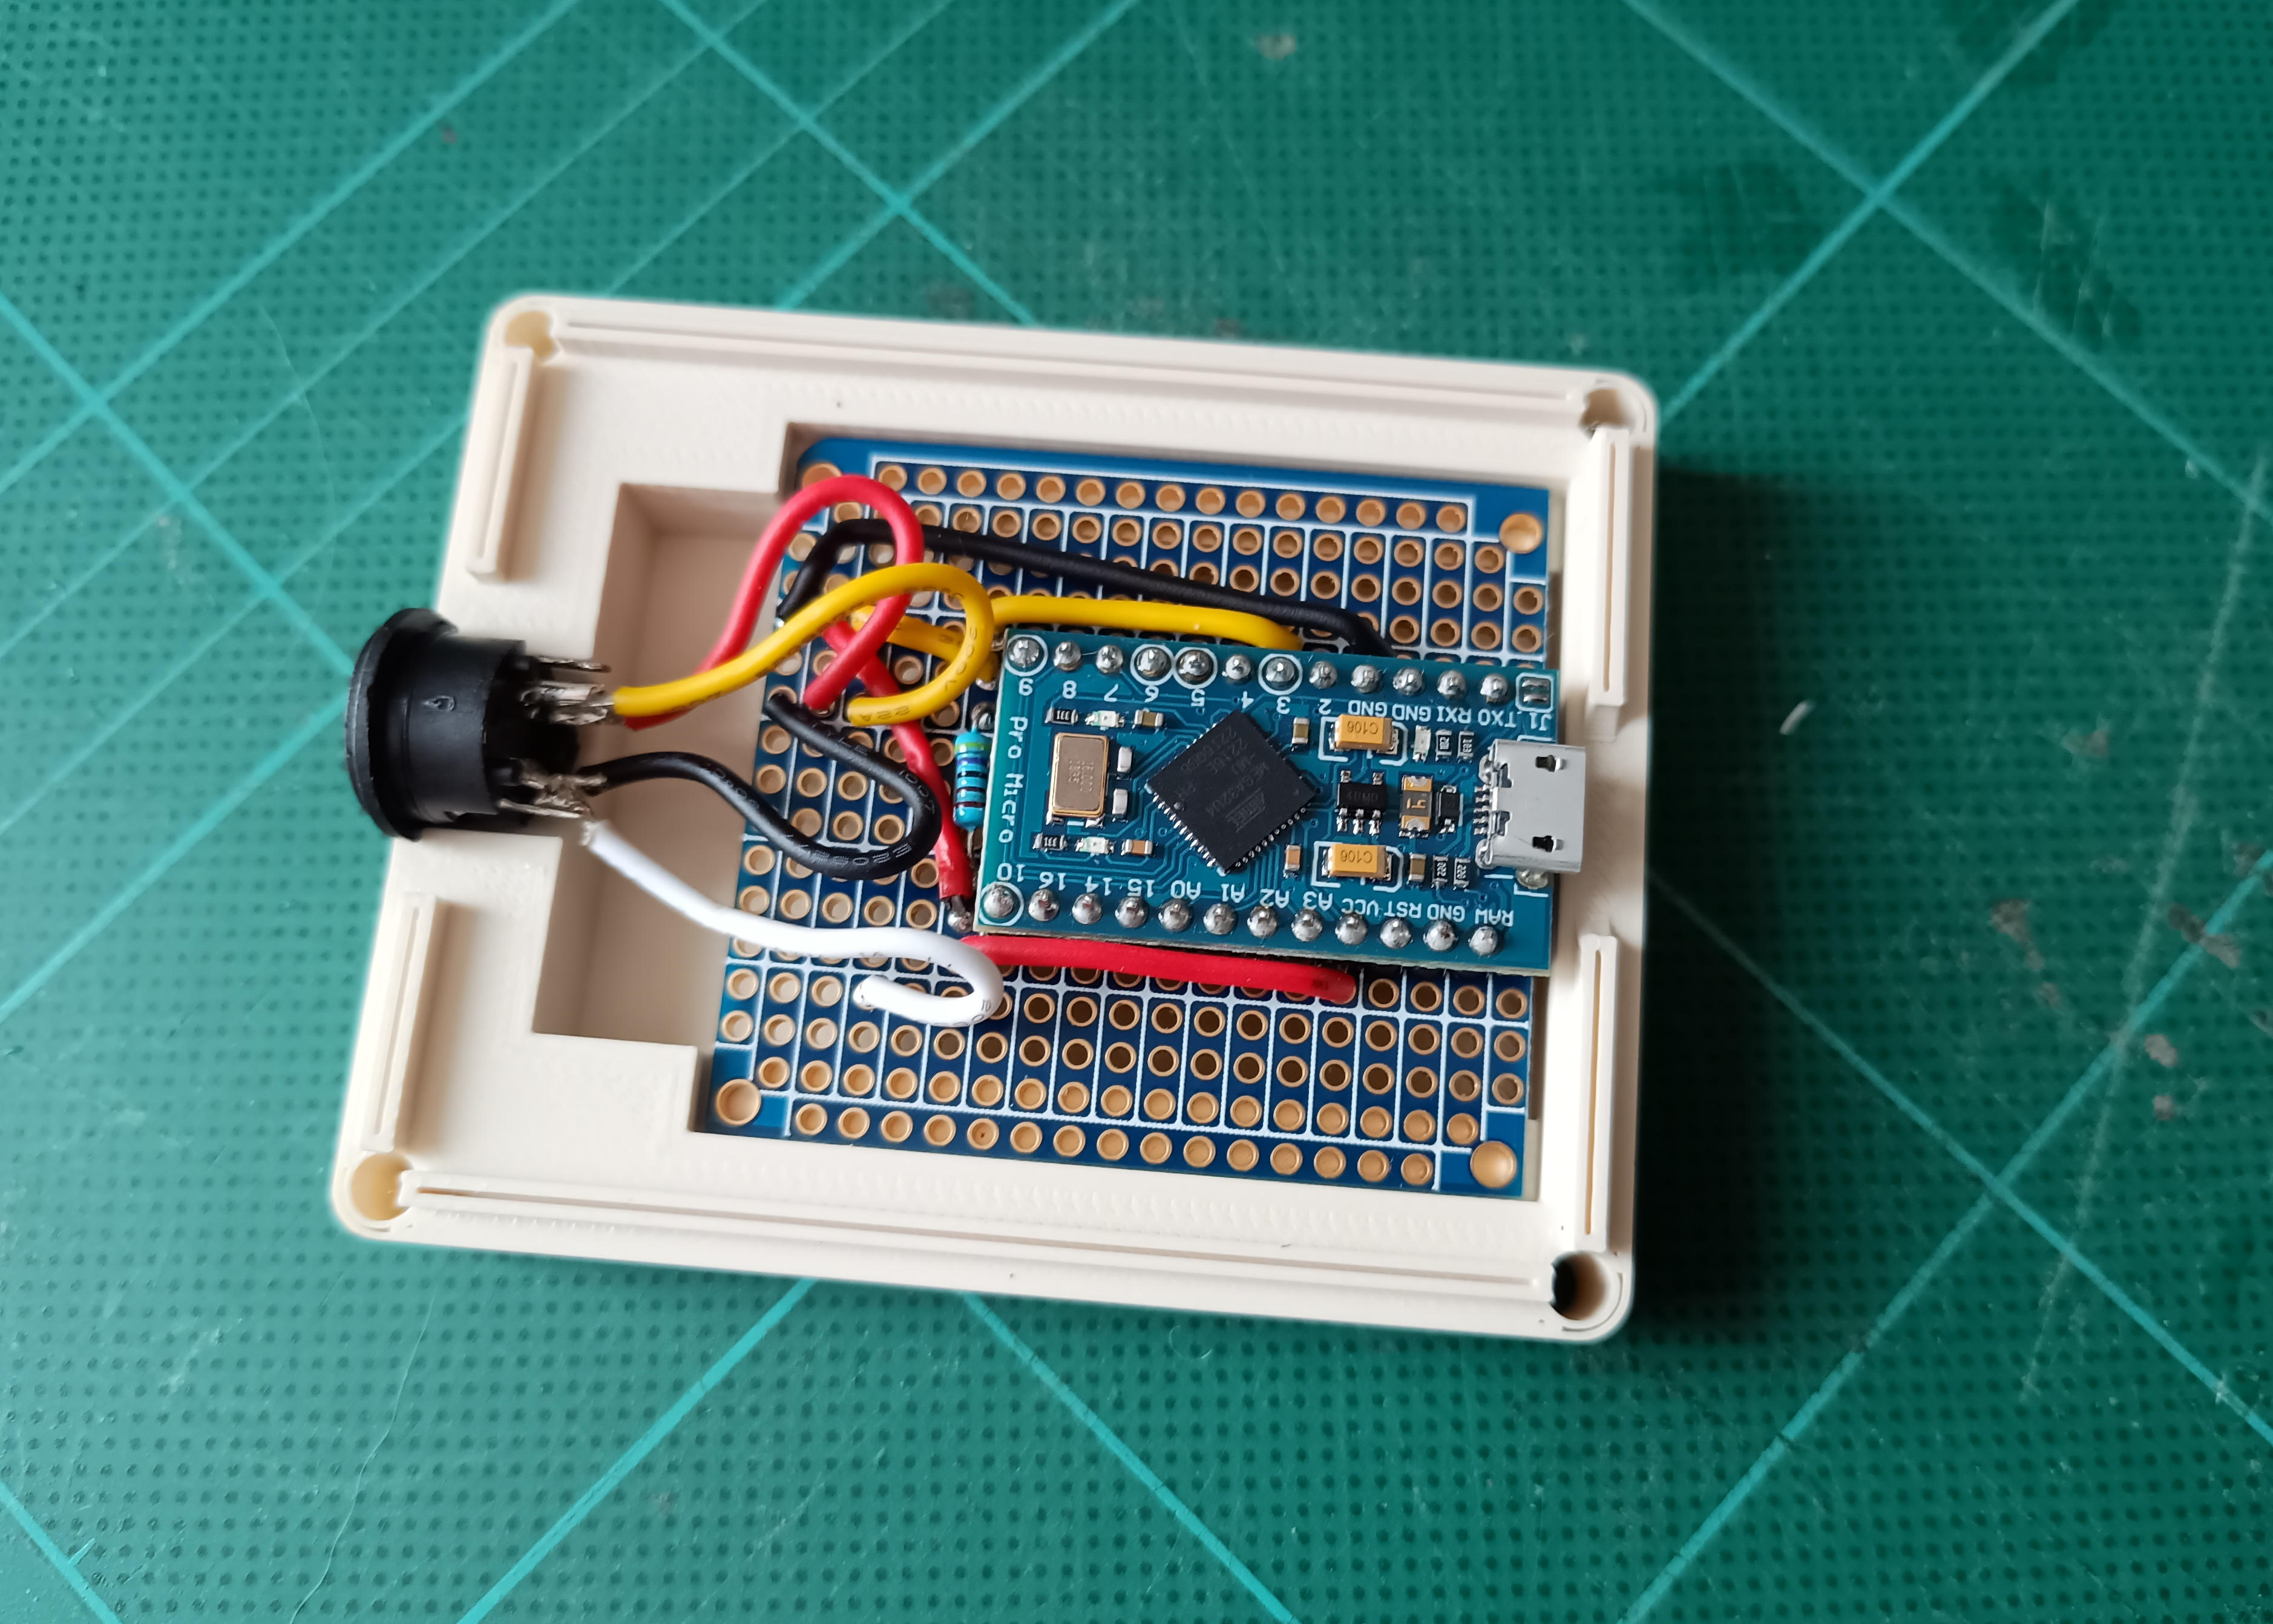
The exposed electronics
You can see there’s almost nothing except the microcontroller here - a resistor and a few wires with all the smarts being the pre-existing controller board. I was pleased with the fit of the DIN connector though - it has a 1mm ridge that holds it securely in place and I got a good fit for this despite the necessary variability in the physical output versus digital input.
The result, inline to the keyboard and bolted together, is respectably beige. If I retro-bright the keyboard it would be a better match for the shade, but I quite enjoy the legacy-discoloration of the keyboard.
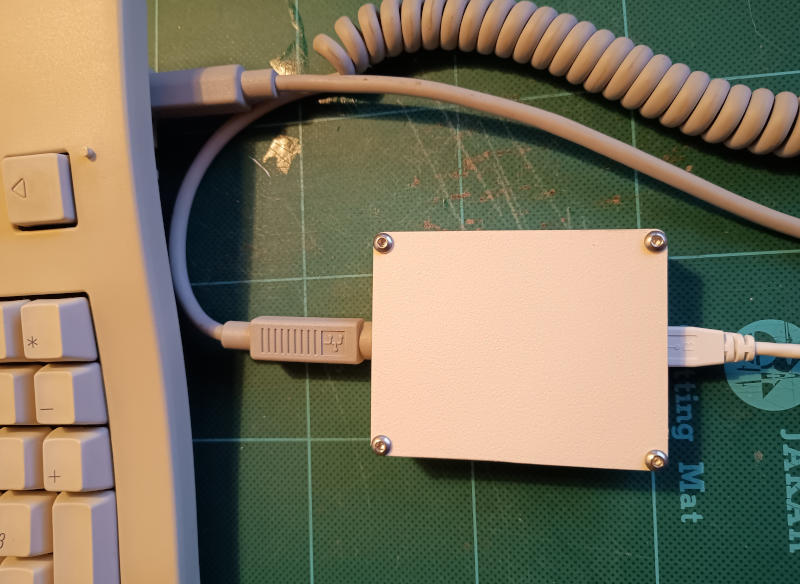
The adapter inline
Anyway, it worked out ok as I’m typing these words on the Apple Extended Keyboard now!
Next steps are to figure out how (if) one can get a suitable key mapped as the function key - though since I mostly use it to switch between multimedia mode and “natural” F1 to F12 keys, I can do without it if necessary. In that case I’d set up for F-keys to be default and hit the laptop keyboard’s Fn key directly when I need the multimedia ones.
So far the only problem I have is that … I don’t actually like it as much as the modern external keyboard that work supplied. We’ll see if it grows on me, but building it was fun so I consider myself amply rewarded regardless.
Hacker News footnotes:
On a whim I posted this to Hacker News and it sank fairly quickly off the front of the New page without any votes; I was faintly surprised to see it pop up on the front page this morning and gratified that it got a bunch of upvotes and some nice discourse in the comments.
Firstly, HN user ‘Someone’ points out that while I talk about how Apple “did things a bit differently” by inventing their own keyboard port, the IBM PS/2 that established the PC world’s standard (or at least the smaller DIN physical format for the earlier PC/AT standard) actually came later than the Apple ADB solution. Regardless of which had seniority, I think ADB was pretty clearly the superior standard to PS/2, being both hot-swappable and more versatile.
Several HN users pointed out (quite rightly) that my title was poorly phrased and gave the impression that I had built an adapter for USB keyboards on older ADB Macs, rather than the opposite case of ADB keyboards on newer USB Macs. Apologies for the confusion; I realised this just after I posted it to HN, but I’ll leave the title as-is and accept my shame.
Then a bunch of HN users suggested alternative projects:
- For USB keyboards on ADB mac (and many others), user dekuNukem suggests their project
- For almost modern PS/2 keyboard with even older Mac (128/512/Plus), user t0mek suggests their project
- For using the mouse from Macs of that vintage on a modern PC, user floren suggests their project
- For USB keyboards on an obscure Canadian TV computer from 1982, user masto suggests their prototype project
- For using modern USB devices on ADB, user Androda suggests projects…
And others suggested off the shelf gadgets:
- donatj recommends Griffin iMate ADB-to-USB adapter: https://www.amazon.com/gp/product/B000067V8L/
- dmd notes that you can also buy adapters “off the shelf” from https://www.drakware.com/ .
- Cenk hears good things about TinkerBoy’s adapter, noting that it even supports QMK and Via: https://www.tinkerboy.xyz/product/tinkerboy-adb-to-usb-keyboard-mouse-converter/
- NexRebular finds that the Wombat works wonderfully for them with a wireless Logitech MX desktop on their Quadra: https://www.bigmessowires.com/usb-wombat/
- They note also that key mappings can also be fully customized if needed.
Finally, user ungamedplayer mentioned that they were “mid process of adding adb for qmk” (i.e. an ADB Keyboard to USB converter) and found a few interested parties.
Lots of cool stuff; thanks!