Ender Extended
Oct 16, 2022
3d printing
ender
extender
marlin
upgrades
After getting stuck in PostNord limbo for a week or two my Ender Extender 400 kit has finally arrived. This lets me expand the build platform of my Creality Ender 3 Pro from a paltry 235mm square to 400mm square. On paper that’s a small difference, but it looks a lot bigger in real life.
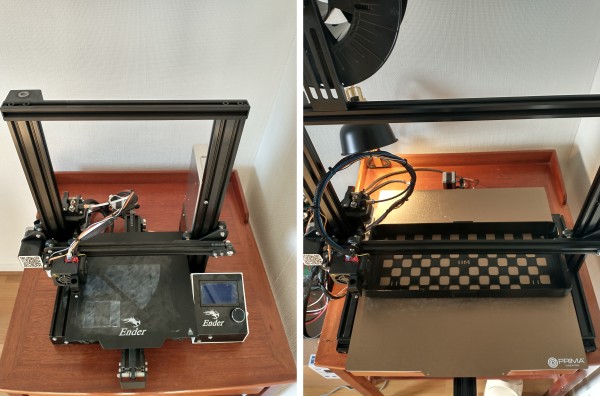
Before... and after!
The kit is actually quite spartan - the major components are a handful of longer aluminium extrusions (the struts that form the frame of the printer), and the much larger print bed. I ordered the large 600W mains-powered heating pad too, as the standard one always seemed to take an age to heat up even before giving it a lot more surface to deal with.
The instructions are not provided in the box, but are available to download directly from the Ender Extender website, so you get a chance to see what you’re letting yourself in for before committing.
Dismantling & Assembling
I’d say that this took me about five or six hours not counting breaks.
I found the dismantling process pretty easy. The original Ender 3 Pro arrives in semi-dismantled form anyway, so some of this is just reversing a process one has already been through, although there are a few extra steps. More of the gantry holding the print head ends up disassembled, for example. There seemed to be a step missing from this part of the instructions; one needs to fully disassemble the remaining base after removing the print bed. It’s fairly obvious once one gets there though.
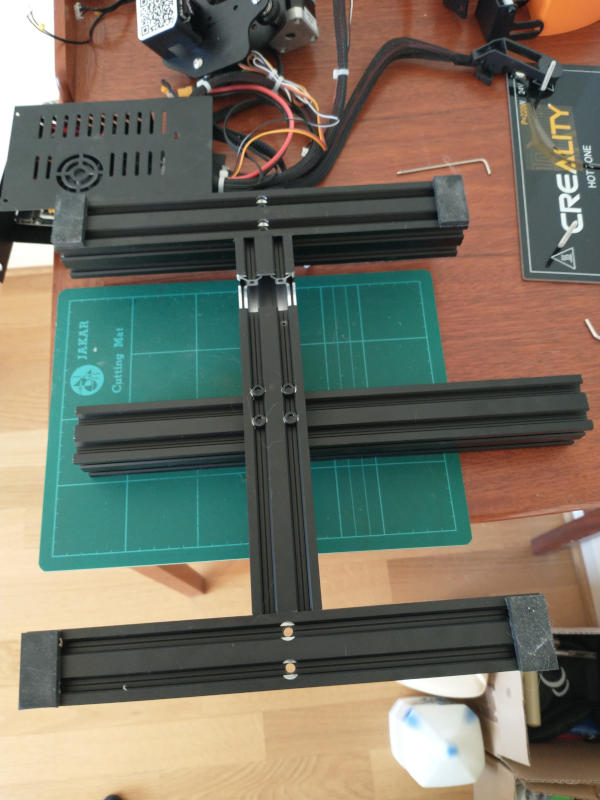
Not quite finished dismantling!
The assembly instructions were slightly harder to follow. I had a couple of trivial issues with them - one notable one was that they don’t explicitly note that the holes for the Y-axis belt tensioner on the Y-axis extrusion need to be on the lower half of the extrusion, not the upper half. The same as with the original shorter Y-axis extrusion, but it was an easy detail to miss and required a bit of disassembly to correct for.
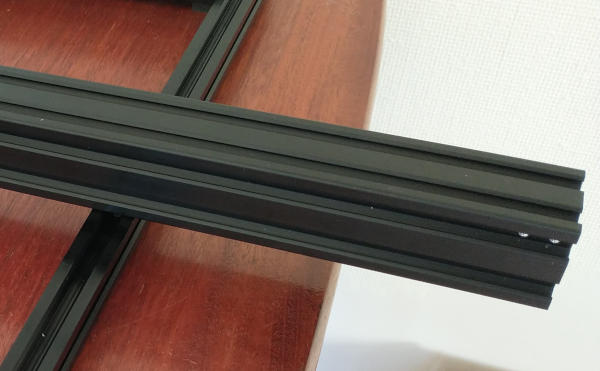
Those holes should be at the bottom, not the top :'(
Getting the heat pad glued to the print bed is tricky. I ended up with mine a few millimetres off where I would have wanted it despite taking a lot of care to get it right. Prior to that I transferred over the thermistor from the old bed to the new one. Annoyingly, after sorting that out, I realised that there were a couple of extra wires on the heat pad that look suspiciously like they’re a pre-provided thermistor - I’ll check in with Ender Extender to see if that’s the case. Too late for me, but if you have this you might be able to avoid that step (though it turns out Kapton tape is quite resilient so the transfer wasn’t a huge hassle).
The instructions end a bit abruptly right after restoring the print bed; they direct one to follow the original Ender assembly instructions for the rest of the build, but in fact there are a few steps (such as putting everything back together for the print head gantry) not covered in the original construction, but it’s all actually fairly obvious. I did manage to put a servo motor on upside down but that didn’t take long to correct.
Oh and take careful note of where all the cables into your printer’s motherboard connect; I scribbled all of this down as a handy memory jogger before starting the build - one very frazzled day later I was thankful for the precaution.
All in all I’m pretty happy with the kit as provided at that price point.
Software support
The instructions contain accurate steps to adjust Cura for the larger print bed, so that was a non-issue. I’d anticipated the need to update Marlin, so I had refreshed my memory on how to build my firmware. Bearing in mind that I had already changed the firmware to allow for my already somewhat customised hardware, the only strictly necessary change was to extend the bed size so that it’s possible to move the various stepper motors beyond the original limits:
// Was originally 235 (mm) for both values
#define X_BED_SIZE 410
#define Y_BED_SIZE 410
With a larger bed I elected to include a “few” more points in the bilinear leveling grid:
// I previously had this set to 4
#define GRID_MAX_POINTS_X 9
I turned on edge extrapolation; with the mounting points relatively (given the increased area) close to the centre of the bed now, it seems reasonable to assume that the distortion will originate there and continue out beyond the probing range:
#define EXTRAPOLATE_BEYOND_GRID
Prior to getting a suitable print bed, I wanted to test that printing was working successfully with everything by using painters’ (masking) tape
directly on the print bed - however I kept getting Error:Probing Failed errors when trying to do leveling operations. This looked like it might
be due to an issue where the range of legal Z axis values was overly constrained; a bigger bed can warp more. I loosened this from -2 to -5
and the problem went away so hopefully that’s all it was:
#define Z_PROBE_LOW_POINT -5 // Farthest distance below the trigger-point to go before stopping
Happily I didn’t have any firmware-specific problems and these were the only new changes I made.
Extras
The print bed as delivered is actually 410mm square, so I ordered a PrimaCreator Flexplate magnetic print surface in the 410mm square size. I was dreading putting the magnetic sticker on without fucking that up, but I loved having the magnetic print surface on the original format Ender, so it seemed worth the effort. It’s actually a terrific fit for the print bed as supplied - no trimming or anything like that. The magnetic sticker is perhaps a fraction of a milimeter off on the corners and everything else is perfect (by design the steel and PEI print surface overhangs the sticker a little).
This is how closely the magnetic sticker fits!
There’s a hilarious video from 3D Prima, reminiscent of the “Now draw the rest of the fucking owl” meme, that completely fails to show how to go about sticking the magnet sheet onto the base. Happily there’s also a much better one from Nero 3D that actually shows what looked like a viable approach. In practice this worked great - and in fact the magnetic sticker sheet is much thicker than it looked online, so there was no real risk of trapping air bubbles (my main concern). On first usage I had some trouble with prints not sticking to the PEI surface - dialing the temperature down a bit (the heated bed overshoots more than the old one did) and scuffing the new surface a bit with a green dish scrubber has mostly resolved that, although at the moment I still seem to need gluestick.
One ends up with quite a few raw-ends on the extrusions as a result of the upgrade, so I’m printing off a few plastic end stops from Thingiverse to neaten things up:
- For 2020 extrusions
- For the visible part of the 4040 extrusions on the base I remixed design “Ender 3 (Pro) Frame end cap (Flat) (4040 profile)” in Tinkercad by just chopping it in half.
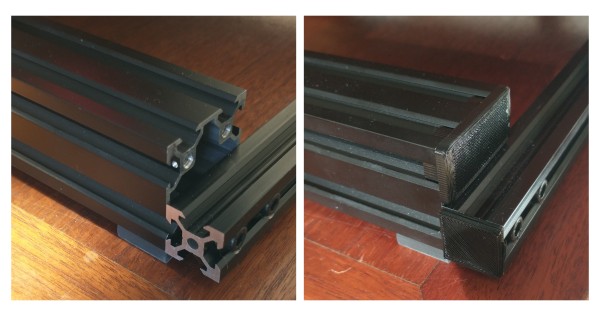
Exposed extrusion ends (before and after capping)
Finally, the electronic components (motherboard, screen, power supply, relay for the bed heater, and a Raspberry Pi) are currently loosely laid out next to the upgraded printer:
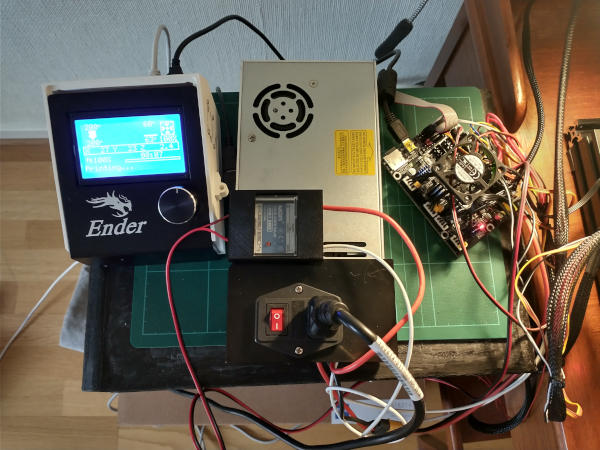
You can't fault my new design for airflow!
The Ender Extender instructions (and extension cables) do allow for the restoration of the electronics to roughly the original locations, but after the upgrade the space under the printer is much more open (being a rectangle rathen than an ‘I’ shape) and so I plan to design or remix a suitable case for them to all go into this space. I’ll probably try for a more compact case on one of the front corners of the base for the display as I mostly interact with the printer via Octoprint running on the Pi.
Leveling
On leveling completion (g-code G29) the bilinear leveling spits out the relative correction values, so here they are in all their glory:
| 0 | 1 | 2 | 3 | 4 | 5 | 6 | 7 | 8 | |
| 0 | -3.670 | -3.023 | -2.352 | -1.717 | -1.043 | -0.333 | +0.345 | +1.062 | +1.795 |
| 1 | -3.678 | -3.030 | -2.423 | -1.775 | -1.058 | -0.345 | +0.415 | +1.315 | +2.080 |
| 2 | -3.378 | -2.600 | -1.970 | -1.312 | -0.588 | +0.040 | +0.735 | +1.462 | +2.200 |
| 3 | -3.015 | -2.545 | -2.003 | -1.355 | -0.653 | +0.012 | +0.717 | +1.657 | +2.377 |
| 4 | -2.888 | -2.225 | -1.588 | -0.940 | -0.265 | +0.412 | +1.140 | +1.840 | +2.635 |
| 5 | -2.770 | -2.287 | -1.675 | -1.015 | -0.325 | +0.352 | +1.043 | +2.012 | +2.772 |
| 6 | -2.615 | -1.953 | -1.268 | -0.613 | +0.015 | +0.715 | +1.430 | +2.150 | +2.963 |
| 7 | -2.432 | -1.965 | -1.370 | -0.733 | -0.073 | +0.577 | +1.290 | +2.267 | +3.072 |
| 8 | -2.290 | -1.635 | -0.948 | -0.310 | +0.345 | +1.022 | +1.707 | +2.427 | +3.267 |
Note the strong tilt down from back right (8,8) to front left (0,0).
This is after some changes to the bed, so it doesn’t prove that the Z_PROBE_LOW_POINT
was the issue causing the probing failures, but with the front left corner being -3.67
units below the reference probe point does suggest that this could have been the
problem.
Let’s see how that looks with the Bed Visualizer plugin in OctoPrint:
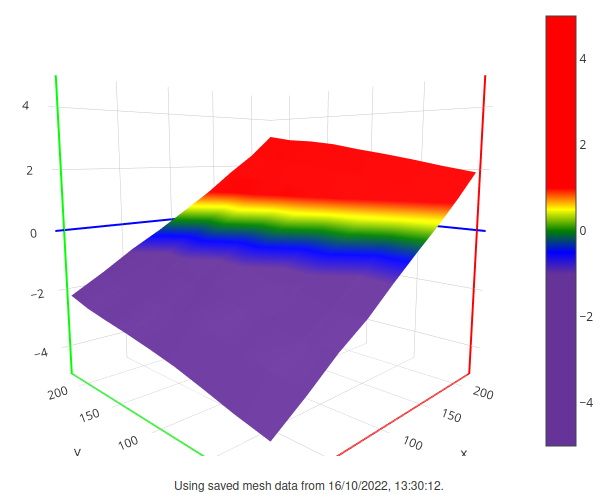
Bed visualizer says 'Wheeee!'
The vizualizer exaggerates the slope, but even so it’s pretty steep. I’ll even it up a bit at some point, but with the leveling correction applied it doesn’t really matter. I’m off to print some really BIG things…