Make Things
Jun 20, 2020
makerspace
3d printing
escutcheon
projector
freecad
At any given time I seem to have about a dozen ridiculous pipe-dream projects kicking around my head. Often enough I’ll start one or another in a desultory way, but typically I don’t get very far. In some ways that’s the joy of personal projects - when I get bored of them, or (more likely) my eye is caught by the shiny new thing, I can leave them unfinished with no consequences.
Occasionally I manage to complete something (a few book projects being the more conspicuous successes), and just lately I’ve got a bit better at completing some of my smaller projects. My usual time-sinks are daily commuting and dance activities - and both of those have been knocked on the head by the pandemic situation, so I’ve had an extra productive few months and a chance to get somewhere on one of my New Year’s resolutions - learning to do some 3D printing.
While learning 3D printing is a goal in itself for me, I have several sub-projects of varying ambition that I’m interested in tackling with the technology.
- A replacement lock fitting for my bureau
- A replacement part for a damaged projector screen
- Fitting a Single Lens Reflex (SLR) camera lens to a USB webcam
- Duplicating a vintage laptop
- Creating a custom belt hasp for my wife
I’m happy with the initial progress.
A replacement lock fitting
Specifically, I want to replace the brass escutcheon insert that was lost from the bureau that I inherited from my great-aunt. I did have a cursory look for a part to purchase, but even once one has figured out what search term to use (“escutcheon” is not really an everyday term) it’s hard to find something that has the right dimensions. Besides, I want to learn how to do 3D printing so here’s a nice small opportunity.

The (missing) escutcheon insert
Also, as you can see in the figure, the shape’s not very exact. Initially I’ll try building an exactly symmetrical piece like the ones I can buy, but I suspect I will later have to amend the shape to something more tailored to this exact hole!
I’ve been a Linux user since I was at college over 25 years ago and I don’t use anything else when I can avoid it. This restricts my options a lot when it comes to choosing CAD software to design my parts with. Currently I’m getting up to speed with FreeCAD and I’ve made some progress with it. A caution though - if you have other platforms available to you, I don’t necessarily recommend it. It’s buggy and has some serious limitations. On the other hand it seems like it’s possible to get it to do all the things I want, so I’m sticking with it for now. I must admit, though, I got so frustrated the other day that I was seriously considering installing Windows in a VM in order to use commercial software - I have no problem with commercial solutions per se; it’s just Windows and OSX that I’m not keen on!
To those determined to work with FreeCAD I have so far found this series of videos to be helpful - and I’m following along successfully in FreeCAD 0.18 although the videos are actually for the beta 0.19 version. Be aware that FreeCAD changes quite a bit between versions and I found another 0.16 based set of tutorials to be impossible to follow for this reason.
Despite the frustrations, I have produced a 3D model that I’m fairly happy with, primarily by using the “Sketch” and “Part Design” workbenches.
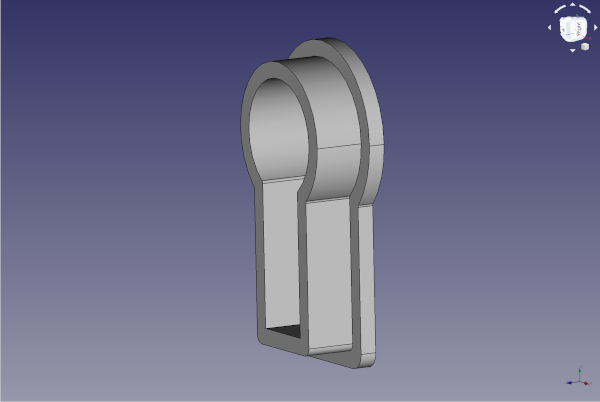
The escutcheon insert design
With the part design, I then chose to upload the raw design to i.materialise.com online to be physically printed in brass. I did also consider Shapeways, and Sculpteo but the prices and/or shipping costs and delays were best with i.materialise. When my part arrives we’ll see if I made the right choice!
The 3D printing process for brass is actually pretty complex - first a wax model is printed. Then a mold is created from the wax model. Then the wax model is melted to remove it from the mold, and finally the brass is cast into the mold to create the end result. I’m looking forward to seeing what the end result is like. Setting aside my 3D skills, if the end result is satisfying I expect to use this process but with a nicer metal to produce a belt hasp for my wife.
A replacement projector clip
Although the printing & shipping costs with i.materialise were acceptable, they do have a minimum order value of €30, so I decided to print a clip for a projector screen at the same time. My wife and I bought the screen (it’s the sort one would have used with a slide or cine projector perhaps 40 years ago) at one of our favourite nearby charity shops, Läkarmissionen, near to us in the suburbs of Stockholm. It works fine, but the clip at the top is damaged, and it would be nice to replace it with something more secure.
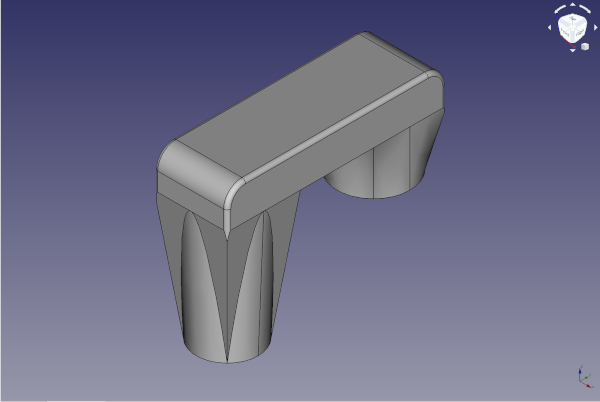
The projector clip design
I added this to the order to be printed in Nylon (a much more direct process), and I’m looking forward to seeing how that turns out. Incidentally, I was almost in tears of frustration trying to work out how to create some of the shapes involved. Eventually I figured out that I needed to “loft” the shape from two sketched squares rather than trying to use the “wedge” primitive (whose parameters are desperately counter-intuitive to the naïve beginner that I am). Just part of the learning curve I guess.
Fitting an SLR lens to a USB webcam
Having got to the point where I think I can more-or-less competently build simple things in 3D my next project will be to dismantle a cheap USB camera and build a housing for it that will allow me to mount a lens from an old SLR camera onto it. The idea is to see whether decent optics on a cheap camera make much difference, or whether the tiny sensor is really the sticking point. Hopefully the end result will at least look nerd-cool!
Because this will probably require me to 3D print a threaded hole for the lens to mount to (it’s an “M42” adapter lens), I also decided to finally bite the bullet and sign up for my local Makerspace in Stockholm. I get to collect my key and have a look around this coming Wednesday and I’m like a kid at Christmas waiting for it!
Perusing their list of equipment (in Swedish), I noticed a reference to a “Tap & Die” set, though, so it’s possible that’s what I will need to use and that I should print the mounting without any thread at all. On the other hand it might be too wide. We shall see - and perhaps someone there will be able to give me advice on that.
Duplicating a vintage laptop
Years ago a colleague had one of the amazing Thinkpad 701C laptop with the “butterfly” keyboard. Ever since I’ve hankered after them, but of course they’re spectacularly obsolete at this point. So obsolete, in fact, that the patents have - or soon will have - expired.
So currently it’s a pure pipedream, but I’d love to 3D print a version of this that can take a modern device (probably a Raspberry Pi) while reproducing that amazing bigger-than-the-laptop-it-comes-in keyboard.
Well. Not a pure pipedream. I bought an old 701C on ebay and so I have a reference source for all my measurements and materials information. Watch this space!
A Belt hasp
My wife has an outline of a design for a belt hasp in mind, and I’d like to create one for her. Until I get a bit more adept with the FreeCAD package (and likely with Blender as well as it’s a rather organic shape), this one is also on the back burner.