Boot across the network
Jun 9, 2024
m73
lenovo
homelab
kubernetes
tftp
nfs
dhcp
Putting together a homelab Kubernetes cluster in my own stubborn way. I’m assuming a reader who’s basically me before I embarked on this little expedition, so I won’t go into minute detail about day-to-day Linux setup and administration - only the things that are new to me and have changed since I last encountered them.
- Part 0 - Best laid plans
- Part 1 - Installing the hardware
- Part 2 - Boot across the network
- Part 3 - PXE Booting Debian with an NFS Root Filesystem
- Part 4 - Filesystems for everybody!
- Part 5 - Getting a clean boot
- Part 6 - Kubernetes at last
Sections added as I actually proceed with this!
Another day another thumb drive
Once I had the machine I’d selected to be my Cluster Gateway set up to my satisfaction (including attaching a 256Gb SATA SSD to the internal socket), I installed Debian 12 Bookworm in the Server (no desktop) mode. I used the debian-12.5.0-amd64-netinst.iso network-install image, and put that onto another USB thumb drive with Startup Disk Creator as usual (using my Ubuntu laptop). Booting that on the Cluster Gateway, I completed the installation and verified that I could boot up directly from the SATA drive, still see both the network devices, and ping the internet on the one connected to my normal network switch and router.
The Telia router was assigning it the 192.168.1.157 IP address as expected, so I also mapped a subdomain of
my own to the machine for my own convenience - so this machine becomes cluster-gateway.paperstack.com (and that
currently resolves to that private IP address). Don’t use that domain name for anything of your own though; I might
change it or delete it without notice. But at the time of writing you can use dig or nslookup to show that it
resolves as expected.
$ dig A +short cluster-gateway.paperstack.com
192.168.1.157
I also verified that I could ssh into it from my Ubuntu laptop - and that this still worked ok even if it was running headless with no keyboard.
Any port in a storm
The next step was to set up that second ethernet device. The “primary” device was enp2s0 and that’s set up to
connect to my router. The secondary device was eno1 and this needs to be specified as the gateway for the new subnet.
A reminder of how those devices look at this point:
$ ip address
1: lo: <LOOPBACK,UP,LOWER_UP> mtu 65536 qdisc noqueue state UNKNOWN group default qlen 1000
    link/loopback 00:00:00:00:00:00 brd 00:00:00:00:00:00
    inet 127.0.0.1/8 scope host lo
       valid_lft forever preferred_lft forever
    inet6 ::1/128 scope host noprefixroute
       valid_lft forever preferred_lft forever
2: enp2s0: <BROADCAST,MULTICAST,UP,LOWER_UP> mtu 1500 qdisc fq_codel state UP group default qlen 1000
    link/ether 00:e0:4c:68:01:77 brd ff:ff:ff:ff:ff:ff
    inet 192.168.1.157/24 brd 192.168.1.255 scope global dynamic enp2s0
       valid_lft 2631sec preferred_lft 2631sec
    inet6 2001:2042:3750:d500:2e0:4cff:fe68:177/64 scope global dynamic mngtmpaddr
       valid_lft 1170sec preferred_lft 1170sec
    inet6 fe80::2e0:4cff:fe68:177/64 scope link
       valid_lft forever preferred_lft forever
3: eno1: <BROADCAST,MULTICAST> mtu 1500 qdisc noop state DOWN group default qlen 1000
    link/ether 00:23:24:94:35:59 brd ff:ff:ff:ff:ff:ff
    altname enp0s25
I need to specify an IP address and subnet for eno1 in the /etc/network/interfaces configuration file. To do this
I add the following lines:
auto eno1
iface eno1 inet static
  address 192.168.0.254/24
The Debian NetworkConfiguration wiki page is good for an overview of this stuff and the interfaces (5) man page for the details.
Here auto means that the device will be brought up by ìfup at boot time. The iface defines a network interface
for this device, inet specifies that it’s for TCP/IP (i.e. internet protocol) and static that it is
explicitly defined here and won’t look for a DHCP server on the network to figure out its address. Then address
defines that static address.
The combination of the specific IP address for the interface 192.168.0.254 and the
CIDR /24 tells us that the subnet is the last 8
bits of that - so the subnet is for addresses 192.168.0.0 through to 192.168.0.255. The highest bit of a subnet
range is the broadcast address - so after a reboot (or an ifup) the interface config looks good:
$ ip address
1: lo: <LOOPBACK,UP,LOWER_UP> mtu 65536 qdisc noqueue state UNKNOWN group default qlen 1000
    link/loopback 00:00:00:00:00:00 brd 00:00:00:00:00:00
    inet 127.0.0.1/8 scope host lo
       valid_lft forever preferred_lft forever
    inet6 ::1/128 scope host noprefixroute
       valid_lft forever preferred_lft forever
2: enp2s0: <BROADCAST,MULTICAST,UP,LOWER_UP> mtu 1500 qdisc fq_codel state UP group default qlen 1000
    link/ether 00:e0:4c:68:01:77 brd ff:ff:ff:ff:ff:ff
    inet 192.168.1.157/24 brd 192.168.1.255 scope global dynamic enp2s0
       valid_lft 3520sec preferred_lft 3520sec
    inet6 2001:2042:3750:d500:2e0:4cff:fe68:177/64 scope global dynamic mngtmpaddr
       valid_lft 1173sec preferred_lft 1173sec
    inet6 fe80::2e0:4cff:fe68:177/64 scope link
       valid_lft forever preferred_lft forever
3: eno1: <BROADCAST,MULTICAST,UP,LOWER_UP> mtu 1500 qdisc fq_codel state UP group default qlen 1000
    link/ether 00:23:24:94:35:59 brd ff:ff:ff:ff:ff:ff
    altname enp0s25
    inet 192.168.0.254/24 brd 192.168.0.255 scope global eno1
       valid_lft forever preferred_lft forever
    inet6 fe80::223:24ff:fe94:3559/64 scope link
       valid_lft forever preferred_lft forever
A more normal address for the gateway/router would be the 192.168.0.1 address. I forgot that while I was setting
it up, and it doesn’t actually matter very much. If you prefer a less weird address for your gateway, amend
accordingly!
IP addresses for everyone!
Next up was to setup the cluster gateway as a DHCP server on the eno1 interface, handing out IP addresses to any
machine that boots up while attached to the cluster switch. This is fairly straight forward! Firstly to install the
DHCP daemon, for which I used isc-dhcp-server - apparently that’s deprecated in place of the Kea server from the same
group, but I’m not looking for perfection in this config and there was more info readily available on isc-dhcp.
Installing in Debian is the usual apt magic away:
$ sudo apt install isc-dhcp-server
Reading package lists... Done
Building dependency tree... Done
Reading state information... Done
The following additional packages will be installed:
  policycoreutils selinux-utils
Suggested packages:
  policykit-1 isc-dhcp-server-ldap ieee-data
The following NEW packages will be installed:
  isc-dhcp-server policycoreutils selinux-utils
0 upgraded, 3 newly installed, 0 to remove and 0 not upgraded.
Need to get 1,766 kB of archives.
After this operation, 7,818 kB of additional disk space will be used.
Do you want to continue? [Y/n] Y
Get:1 http://deb.debian.org/debian bookworm/main amd64 isc-dhcp-server amd64 4.4.3-P1-2 [1,479 kB]
Get:2 http://deb.debian.org/debian bookworm/main amd64 selinux-utils amd64 3.4-1+b6 [126 kB]
Get:3 http://deb.debian.org/debian bookworm/main amd64 policycoreutils amd64 3.4-1 [161 kB]
Fetched 1,766 kB in 0s (21.8 MB/s)
Preconfiguring packages ...
Selecting previously unselected package isc-dhcp-server.
(Reading database ... 34186 files and directories currently installed.)
Preparing to unpack .../isc-dhcp-server_4.4.3-P1-2_amd64.deb ...
Unpacking isc-dhcp-server (4.4.3-P1-2) ...
Selecting previously unselected package selinux-utils.
Preparing to unpack .../selinux-utils_3.4-1+b6_amd64.deb ...
Unpacking selinux-utils (3.4-1+b6) ...
Selecting previously unselected package policycoreutils.
Preparing to unpack .../policycoreutils_3.4-1_amd64.deb ...
Unpacking policycoreutils (3.4-1) ...
Setting up selinux-utils (3.4-1+b6) ...
Setting up policycoreutils (3.4-1) ...
Setting up isc-dhcp-server (4.4.3-P1-2) ...
Generating /etc/default/isc-dhcp-server...
Job for isc-dhcp-server.service failed because the control process exited with error code.
See "systemctl status isc-dhcp-server.service" and "journalctl -xeu isc-dhcp-server.service" for details.
invoke-rc.d: initscript isc-dhcp-server, action "start" failed.
× isc-dhcp-server.service - LSB: DHCP server
     Loaded: loaded (/etc/init.d/isc-dhcp-server; generated)
     Active: failed (Result: exit-code) since Wed 2024-06-05 20:30:33 CEST; 10ms ago
       Docs: man:systemd-sysv-generator(8)
    Process: 773 ExecStart=/etc/init.d/isc-dhcp-server start (code=exited, status=1/FAILURE)
        CPU: 17ms

Jun 05 20:30:31 cluster-gateway dhcpd[785]: bugs on either our web page at www.isc.org or in the README file
Jun 05 20:30:31 cluster-gateway dhcpd[785]: before submitting a bug.  These pages explain the proper
Jun 05 20:30:31 cluster-gateway dhcpd[785]: process and the information we find helpful for debugging.
Jun 05 20:30:31 cluster-gateway dhcpd[785]:
Jun 05 20:30:31 cluster-gateway dhcpd[785]: exiting.
Jun 05 20:30:33 cluster-gateway isc-dhcp-server[773]: Starting ISC DHCPv4 server: dhcpdcheck syslog for diagnostics. ... failed!
Jun 05 20:30:33 cluster-gateway isc-dhcp-server[773]:  failed!
Jun 05 20:30:33 cluster-gateway systemd[1]: isc-dhcp-server.service: Control process exited, code=exited, status=1/FAILURE
Jun 05 20:30:33 cluster-gateway systemd[1]: isc-dhcp-server.service: Failed with result 'exit-code'.
Jun 05 20:30:33 cluster-gateway systemd[1]: Failed to start isc-dhcp-server.service - LSB: DHCP server.
Processing triggers for man-db (2.11.2-2) ...
Note that it installed but failed to start - next steps were to clean up the configuration. In
/etc/dhcp/dhcpd.conf I amended (for the option commands) and added (for the rest) the following:
option domain-name "paperstack.com";
option domain-name-servers 8.8.8.8, 4.4.4.4;

default-lease-time 600;
max-lease-time 7200;

subnet 192.168.0.0 netmask 255.255.255.0 {
  range 192.168.0.1 192.168.0.253;
  option routers 192.168.0.254;
}
As you can see this will hand out IP addresses in the range 192.168.0.1 through to 192.168.0.255 to clients in the subnet (omitting this machine’s own ip address which is static). It will advertise itself (192.168.0.254) as being the router. The DHCP server and the router don’t have to be the same machine, but I’m making this cluster gateway do all the dirty jobs.
I also edited /etc/default/isc-dhcp-server and changed the line reading:
INTERFACESv4=""
To read:
INTERFACESv4="eno1"
This tells isc-dhcp-server which interface it’s offering DHCP services on.
After a reboot, checking via sudo journalctl -u isc-dhcp-server.service to check the service status, the output
looks promising:
Jun 05 21:02:17 cluster-gateway systemd[1]: Starting isc-dhcp-server.service - LSB: DHCP server...
Jun 05 21:02:17 cluster-gateway isc-dhcp-server[494]: Launching IPv4 server only.
Jun 05 21:02:17 cluster-gateway dhcpd[509]: Wrote 0 leases to leases file.
Jun 05 21:02:17 cluster-gateway dhcpd[509]: Server starting service.
Jun 05 21:02:19 cluster-gateway isc-dhcp-server[494]: Starting ISC DHCPv4 server: dhcpd.
Jun 05 21:02:19 cluster-gateway systemd[1]: Started isc-dhcp-server.service - LSB: DHCP server.
Next up I took one of the machines destined to be a worker node, connected that to the cluster gateway, and booted from my Ubuntu USB stick. Once booted up and in “Try Ubuntu” mode I fired up a terminal…
ubuntu@ubuntu:~$ ip address
1: lo: <LOOPBACK,UP,LOWER_UP> mtu 65536 qdisc noqueue state UNKNOWN group default qlen 1000
    link/loopback 00:00:00:00:00:00 brd 00:00:00:00:00:00
    inet 127.0.0.1/8 scope host lo
       valid_lft forever preferred_lft forever
    inet6 ::1/128 scope host
       valid_lft forever preferred_lft forever
2: eno1: <BROADCAST,MULTICAST,UP,LOWER_UP> mtu 1500 qdisc fq_codel state UP group default qlen 1000
    link/ether 44:8a:5b:dd:d8:ba brd ff:ff:ff:ff:ff:ff
    altname enp0s25
    inet 192.168.0.1/24 brd 192.168.0.255 scope global dynamic noprefixroute eno1
       valid_lft 506sec preferred_lft 506sec
    inet6 fe80::c32d:27c6:68e1:3b7a/64 scope link noprefixroute
       valid_lft forever preferred_lft forever
Hurrah! Its interface eno1 (the built in one - this machine only has that ethernet device) been allocated the first
available IP address of 192.168.0.1 from the pool and brought this up. Let’s see what the routing table looks like:
ubuntu@ubuntu:~$ ip route
default via 192.168.0.254 dev eno1 proto dhcp metric 20100
169.254.0.0/16 dev eno1 scope link metric 1000
192.168.0.0/24 dev eno1 proto kernel scope link src 192.168.0.1 metric 100
Again, that looks right - the default route is via 192.168.0.254 which is the cluster gateway on that network - and
subnet 192.168.0.0/24 is described as being reachable via the eno1 interface. This all makes sense. Finally, testing
it for real, can I ping and even login to that gateway machine over the network?
ubuntu@ubuntu:~$ ping -n 1 -w 1 8.8.8.8
PING 8.8.8.8 (8.8.8.8) 56(124) bytes of data.

--- 8.8.8.8 ping statistics ---
1 packets transmitted, 0 received, 100% packet loss, time 0ms
ubuntu@ubuntu:~$ ssh gateway@192.168.0.254
gateway@192.168.0.254's password:
Linux cluster-gateway 6.1.0-21-amd64 #1 SMP PREEMPT_DYNAMIC Debian 6.1.90-1 (2024-05-03) x86_64

The programs included with the Debian GNU/Linux system are free software;
the exact distribution terms for each program are described in the
individual files in /usr/share/doc/*/copyright.

Debian GNU/Linux comes with ABSOLUTELY NO WARRANTY, to the extent
permitted by applicable law.
Last login: Thu Jun  6 12:44:46 2024 from 192.168.0.1
gateway@cluster-gateway:~$ exit
logout
Connection to 192.168.0.254 closed.
Yes I can. So that’s the most fundamental stuff set up. On the other hand… can I ping my laptop that lives on the other subnet?
$ ping 192.168.1.100
PING 192.168.1.100 (192.168.1.100) 56(84) bytes of data.
^C
--- 192.168.1.100 ping statistics ---
6 packets transmitted, 0 received, 100% packet loss, time 5118ms
Nope. 100% packet loss. But that’s expected.
Network shall speak unto network
The problem is that the cluster gateway hasn’t been told to do anything with packets received from the cluster subnet that’s destined somewhere else. Then even if it had, my laptop doesn’t know what to do with packets destined for the cluster subnet. If we fix both of those we should be able to ping in either direction between the subnets.
Setting up the forwarding on the cluster gateway is amazingly simple. To do this temporarily:
$ sudo su -
$ echo 1 > /proc/sys/net/ipv4/ip_forward
This turns on forwarding for ipv4 packets between the networks attached to the device! Then on a machine (my laptop) on the general subnet, I add an entry to its routing table:
$ sudo route add -net 192.168.0.0/24 gw 192.168.1.157
This basically tells my latop to send packets destined for the subnet 192.168.0.0/24 (i.e. 192.168.0.x) to address
192.168.1.157 on the local subnet - i.e. to the cluster gateway.
With those changes made, my laptop can ping a worker node on the cluster subnet…
$ ping 192.168.0.1
PING 192.168.0.1 (192.168.0.1) 56(84) bytes of data.
64 bytes from 192.168.0.1: icmp_seq=1 ttl=63 time=3.48 ms
64 bytes from 192.168.0.1: icmp_seq=2 ttl=63 time=3.37 ms
64 bytes from 192.168.0.1: icmp_seq=3 ttl=63 time=3.25 ms
^C
--- 192.168.0.1 ping statistics ---
3 packets transmitted, 3 received, 0% packet loss, time 2004ms
rtt min/avg/max/mdev = 3.252/3.365/3.477/0.091 ms
…and that worker node can ping my laptop…
ubuntu@ubuntu:~$ ping 192.168.1.100
PING 192.168.1.100 (192.168.1.100) 56(84) bytes of data.
64 bytes from 192.168.1.100: icmp_seq=1 ttl=63 time=118 ms
64 bytes from 192.168.1.100: icmp_seq=2 ttl=63 time=2.46 ms
^C
--- 192.168.1.100 ping statistics ---
2 packets transmitted, 2 received, 0% packet loss, time 1001ms
rtt min/avg/max/mdev = 2.458/60.294/118.131/57.836 ms
So to make that forwarding permanent on the cluster gateway, I added the following line to /etc/sysctl.conf:
net.ipv4.ip_forward=1 in /etc/sysctl.conf
After a reboot I verified that all this stuff was working ok. I didn’t make the new route to the cluster permanent on my laptop yet (I’ll wait and see if I find that useful later). For now it’s easy enough to add when I need that access.
What doesn’t work at this point, though, is communicating with anything outside my local networks.
For example, if
I try to ping the Google DNS servers at 8.8.8.8 from a worker node on address 192.168.0.1, then my packet will be
sent to the cluster gateway, the cluster gateway will forward it to the Telia router, the Telia router will then
pretend that the packet came from its own public address and send it off to Google.
On the way back, though, when
the packet returns to the Telia router, it will remember that it really originated from 192.168.0.1 … and
at this point get stuck. The Telia router knows nothing about that subnet. It only knows how to send packets
to its own private subnet of 192.168.1.0/24 or the public internet. Some other private subnet is a complete
mystery that it can’t resolve. It also doesn’t provide any way to tell it about the cluster gateway in the
way I could do on my laptop.
The solution is to use the same trick that the Telia router uses to hide its own private subnet from the broader internet to hide the cluster subnet from the Telia router. That trick is Network Address Translation (NAT) and is easy enough to set up.
To set it up temporarily on the cluster gateway…
$ sudo iptables -t nat -A POSTROUTING -o enp2s0 -j MASQUERADE --random
…adds NAT to any existing rules for manipulating IP packets in the gateway’s networking layer.
With this change pinging Google from the worker node now works:
ubuntu@ubuntu:~$ ping -c 1 -w 1 8.8.8.8
PING 8.8.8.8 (8.8.8.8) 56(84) bytes of data.
64 bytes from 8.8.8.8: icmp_seq=1 ttl=55 time=2.59 ms

--- 8.8.8.8 ping statistics ---
1 packets transmitted, 1 received, 0% packet loss, time 0ms
rtt min/avg/max/mdev = 2.588/2.588/2.588/0.000 ms
I was also able to use wget to download a file from an internet URL…
ubuntu@ubuntu:~$ wget paperstack.com
--2024-06-12 18:23:11--  http://paperstack.com/
Resolving paperstack.com (paperstack.com)... 52.85.243.6, 52.85.243.86, 52.85.243.76, ...
Connecting to paperstack.com (paperstack.com)|52.85.243.6|:80... connected.
HTTP request sent, awaiting response... 301 Moved Permanently
Location: https://paperstack.com/ [following]
--2024-06-12 18:23:11--  https://paperstack.com/
Connecting to paperstack.com (paperstack.com)|52.85.243.6|:443... connected.
HTTP request sent, awaiting response... 200 OK
Length: 18484 (18K) [text/html]
Saving to: ‘index.html’

index.html                                                           100%[=====================================================================================================================================================================>]  18.05K  --.-KB/s    in 0s

2024-06-12 18:23:11 (99.9 MB/s) - ‘index.html’ saved [18484/18484]

ubuntu@ubuntu:~$ grep 'title' index.html
    <title>Home | Paperstack</title>
…and browse a web page in Firefox.
To make these NAT changes permanent the easiest way is to install the package iptables-persistent and that will
prompt you to make the existing (temporary) iptables entry permanent by writing it to config files. If that’s
already installed then you can also save the current iptables entries with the command:
$ sudo service netfilter-persistent save
The output from that should be similar to the following:
$ sudo service netfilter-persistent save
Saving netfilter rules...run-parts: executing /usr/share/netfilter-persistent/plugins.d/15-ip4tables save
run-parts: executing /usr/share/netfilter-persistent/plugins.d/25-ip6tables save
done.
After all this I rebooted all the machines and verified that the various pings and accesses were still working ok.
Files across the network
At this point with a DHCP server on the subnet¹ under my full control I was ready to try and configure the PXE (network) booting. This ran through pretty cleanly, although after each step I fired up a worker node (without the USB stick!) to make sure that I was getting appropriate output both on the BIOS boot messages and in the various logs. I’ll skip over some of those details.
Firstly, setting up DHCP to point the client at a TFTP server (which didn’t at this point exist), is a matter of
making some more changes to the subnet entry in the /etc/dhcp/dhcpd.conf file:
subnet 192.168.0.0 netmask 255.255.255.0 {
  range 192.168.0.1 192.168.0.253;
  option routers 192.168.0.254;
  filename "pxelinux.0";
  next-server 192.168.0.254;
}
Here the next-server entry tells the booting client what the subnet IP address of the TFTP server is (again the
cluster gateway is taking this role), and then the filename entry tells it to download and then boot
the pxelinux.0 binary.
After restarting the dhcp service or rebooting the cluster gateway, a new worker node on boot should report that it knows the address of the TFTP server - albeit it won’t be able to boot because it won’t find any boot files there or an active TFTP service! Note also that you must have included the network device configured in the worker node’s BIOS boot sequences.
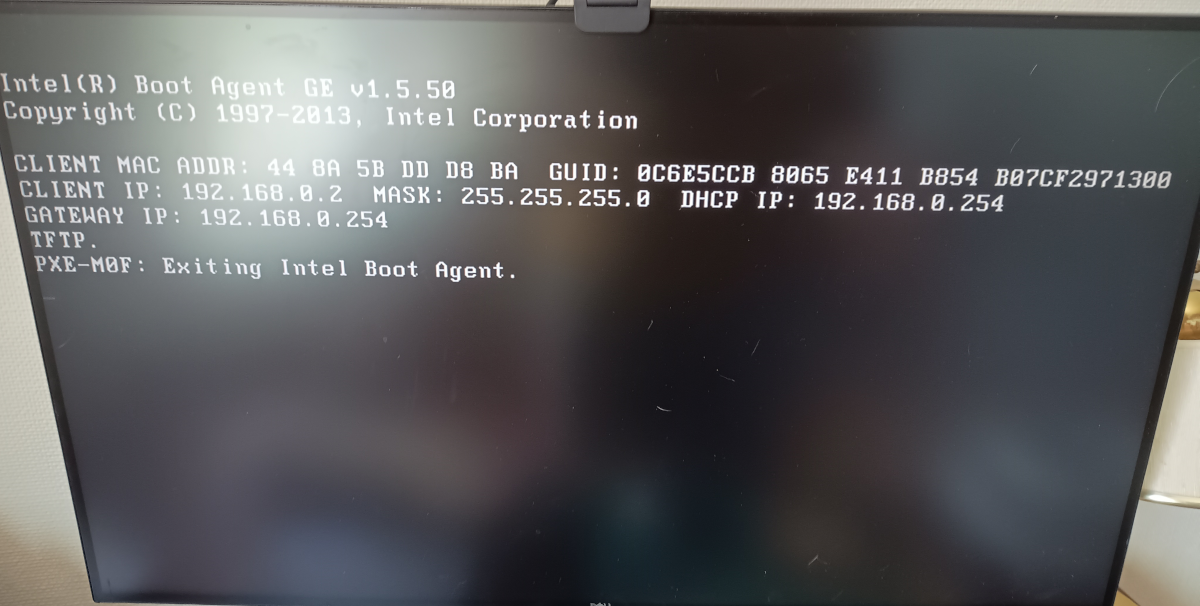
TFTP server address known at boot time
Next up was setting up a TFTP server on the cluster gateway.
$ sudo apt install tftpd-hpa
Reading package lists... Done
Building dependency tree... Done
Reading state information... Done
Suggested packages:
  pxelinux
The following NEW packages will be installed:
  tftpd-hpa
0 upgraded, 1 newly installed, 0 to remove and 0 not upgraded.
Need to get 41.9 kB of archives.
After this operation, 117 kB of additional disk space will be used.
Get:1 http://deb.debian.org/debian bookworm/main amd64 tftpd-hpa amd64 5.2+20150808-1.4 [41.9 kB]
Fetched 41.9 kB in 0s (754 kB/s)
Preconfiguring packages ...
Selecting previously unselected package tftpd-hpa.
(Reading database ... 34742 files and directories currently installed.)
Preparing to unpack .../tftpd-hpa_5.2+20150808-1.4_amd64.deb ...
Unpacking tftpd-hpa (5.2+20150808-1.4) ...
Setting up tftpd-hpa (5.2+20150808-1.4) ...
Processing triggers for man-db (2.11.2-2) ...
Then looking at the config file for the TFTP service…
$ cat /etc/default/tftpd-hpa
# /etc/default/tftpd-hpa

TFTP_USERNAME="tftp"
TFTP_DIRECTORY="/srv/tftp"
TFTP_ADDRESS=":69"a
TFTP_OPTIONS="--secure"
This will serve any files that are placed under the /srv/tftp path.
To test that the tftp server is working, I installed the tftp client:
$ sudo apt install tftp-hpa
Then copied a file into the /srv/tftp directory and made sure I could retrieve it:
$ sudo su -
$ echo "hello" > /srv/tftp/readme.txt
$ exit
logout
$ cd
$ tftp localhost
tftp> get readme.txt
tftp> quit
$ cat readme.txt
hello
Incidentally if the local file is not writable you’ll get “permission denied” when you try to retrieve the file - this is at the client end, not a problem with the server (I encountered this silly issue when I tried to retrieve the file while still in the /srv/tftp directory but no longer logged in as root - that is, accidentally trying to overwrite it and couldn’t because it was owned by root and I wasn’t logged in as root any more! That’s a horrible sentence, but it will probably make sense if you’ve just done this yourself!
Next let’s write something that we can boot from into that directory. There’s a network bootable Debian installer
for Bookworm (the same version of Debian running on the cluster gateway) available as a tar.gz file
and I unpacked that into the /srv/tftp directory:
$ sudo su -
$ cd /srv/tftp
$ sudo wget https://deb.debian.org/debian/dists/bookworm/main/installer-amd64/current/images/netboot/netboot.tar.gz
$ tar -xvf netboot.tar.gz
… and then restarted the worker node, again with no USB drive or anything in it - just the network connection. Behold:
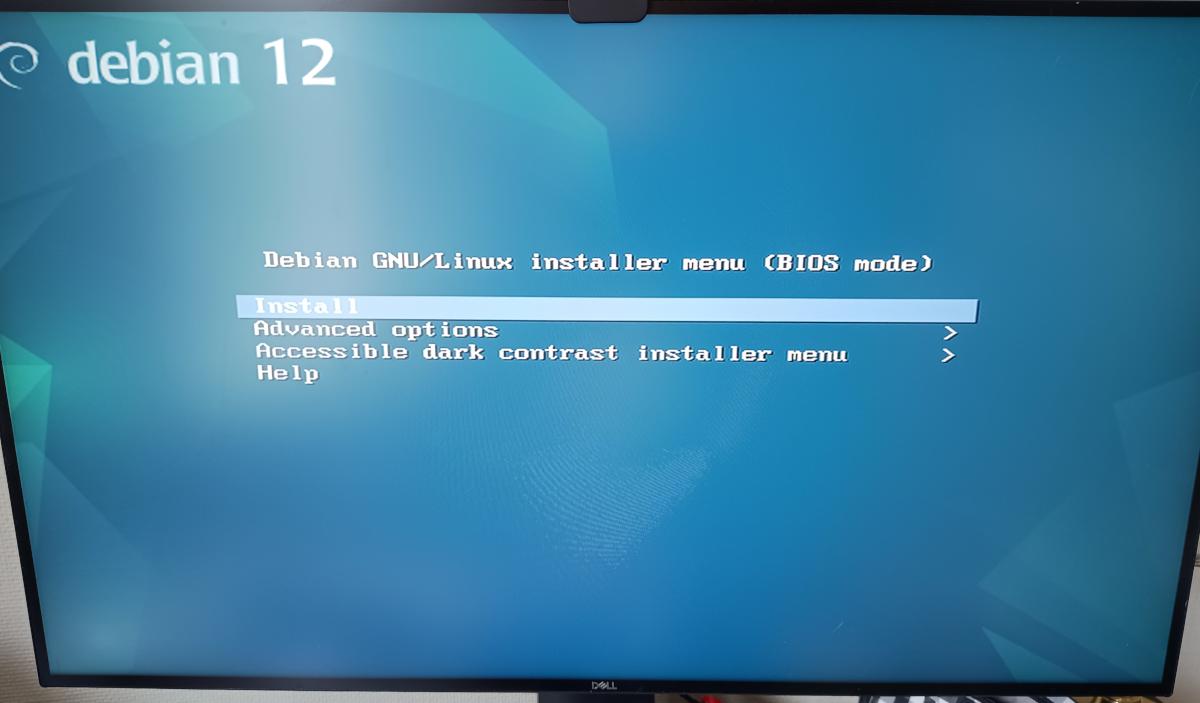
PXE Booted into the installer
So now the essentials are there to get an operating system onto the worker nodes automatically.
Getting ready for the next steps
The last step in this part of the cluster gateway configuration was to set up a Network File Service (NFS) share - when I’m booting my worker nodes I want them to use NFS for their mounted filesystems. This way they don’t need a physical disk individually installed. It will probably be a bit slow, but speed is not of the essence for this underpowered toy cluster. I do have a Synology NAS on my main subnet that’s capable of serving NFS and I might switch to using that later on (as the cluster gateway machine only has a very small SSD installed in it). However I wanted to minimise any network weirdness that migt ensue from trying to network mount a filesystem across the cluster gateway bridge initially.
I’d not set up NFS before and I was pleasantly surprised by how easy it was. Installing the server service:
$ sudo apt install nfs-kernel-server
Reading package lists... Done
Building dependency tree... Done
Reading state information... Done
The following NEW packages will be installed:
  nfs-kernel-server
0 upgraded, 1 newly installed, 0 to remove and 0 not upgraded.
Need to get 151 kB of archives.
After this operation, 626 kB of additional disk space will be used.
Get:1 http://deb.debian.org/debian bookworm/main amd64 nfs-kernel-server amd64 1:2.6.2-4 [151 kB]
Fetched 151 kB in 0s (5,146 kB/s)
Selecting previously unselected package nfs-kernel-server.
(Reading database ... 34951 files and directories currently installed.)
Preparing to unpack .../nfs-kernel-server_1%3a2.6.2-4_amd64.deb ...
Unpacking nfs-kernel-server (1:2.6.2-4) ...
Setting up nfs-kernel-server (1:2.6.2-4) ...
nfs-mountd.service is a disabled or a static unit not running, not starting it.
nfsdcld.service is a disabled or a static unit not running, not starting it.
Processing triggers for man-db (2.11.2-2) ...
Creating a directory that to be shared via NFS:
sudo mkdir /clients
Add a line to the NFS export configuration file /etc/exports
/clients 192.168.0.0/255.255.255.0(rw,no_root_squash,subtree_check)
That declares that any host on the 192.168.0.0/24 (via a bitmask) can mount the filesystem as writable. The next command makes that take effect:
sudo exportfs -a
Then to reload the NFS service to make this visible from client machines:
sudo systemctl restart nfs-mountd.service
After that I wrote a “readme.txt file under /clients so I would be able to verify that the network files were
working ok.
sudo su -
uname -a > /clients/readme.txt
With that I was ready for booting up a worker node from the Ubuntu thumb drive² in the Try Ubuntu mode and then adding the nfs tools to test the new nfs mount…
ubuntu@ubuntu:~$ sudo apt install nfs-common
Reading package lists... Done
Building dependency tree... Done
Reading state information... Done
The following additional packages will be installed:
  libevent-core-2.1-7 rpcbind
Suggested packages:
  open-iscsi watchdog
The following NEW packages will be installed:
  libevent-core-2.1-7 nfs-common rpcbind
0 upgraded, 3 newly installed, 0 to remove and 234 not upgraded.
Need to get 381 kB of archives.
After this operation, 1,328 kB of additional disk space will be used.
Do you want to continue? [Y/n] Y
Get:1 http://archive.ubuntu.com/ubuntu jammy/main amd64 libevent-core-2.1-7 amd64 2.1.12-stable-1build3 [93.9 kB]
Get:2 http://archive.ubuntu.com/ubuntu jammy/main amd64 rpcbind amd64 1.2.6-2build1 [46.6 kB]
Get:3 http://archive.ubuntu.com/ubuntu jammy-updates/main amd64 nfs-common amd64 1:2.6.1-1ubuntu1.2 [241 kB]
Fetched 381 kB in 1s (471 kB/s)
Selecting previously unselected package libevent-core-2.1-7:amd64.
(Reading database ... 208650 files and directories currently installed.)
Preparing to unpack .../libevent-core-2.1-7_2.1.12-stable-1build3_amd64.deb ...
Unpacking libevent-core-2.1-7:amd64 (2.1.12-stable-1build3) ...
Selecting previously unselected package rpcbind.
Preparing to unpack .../rpcbind_1.2.6-2build1_amd64.deb ...
Unpacking rpcbind (1.2.6-2build1) ...
Selecting previously unselected package nfs-common.
Preparing to unpack .../nfs-common_1%3a2.6.1-1ubuntu1.2_amd64.deb ...
Unpacking nfs-common (1:2.6.1-1ubuntu1.2) ...
Setting up rpcbind (1.2.6-2build1) ...
Created symlink /etc/systemd/system/multi-user.target.wants/rpcbind.service → /l
ib/systemd/system/rpcbind.service.
Created symlink /etc/systemd/system/sockets.target.wants/rpcbind.socket → /lib/s
ystemd/system/rpcbind.socket.
Setting up libevent-core-2.1-7:amd64 (2.1.12-stable-1build3) ...
Setting up nfs-common (1:2.6.1-1ubuntu1.2) ...

Creating config file /etc/idmapd.conf with new version

Creating config file /etc/nfs.conf with new version
Adding system user `statd' (UID 130) ...
Adding new user `statd' (UID 130) with group `nogroup' ...
Not creating home directory `/var/lib/nfs'.
Created symlink /etc/systemd/system/multi-user.target.wants/nfs-client.target →
/lib/systemd/system/nfs-client.target.
Created symlink /etc/systemd/system/remote-fs.target.wants/nfs-client.target → /
lib/systemd/system/nfs-client.target.
auth-rpcgss-module.service is a disabled or a static unit, not starting it.
nfs-idmapd.service is a disabled or a static unit, not starting it.
nfs-utils.service is a disabled or a static unit, not starting it.
proc-fs-nfsd.mount is a disabled or a static unit, not starting it.
rpc-gssd.service is a disabled or a static unit, not starting it.
rpc-statd-notify.service is a disabled or a static unit, not starting it.
rpc-statd.service is a disabled or a static unit, not starting it.
rpc-svcgssd.service is a disabled or a static unit, not starting it.
rpc_pipefs.target is a disabled or a static unit, not starting it.
var-lib-nfs-rpc_pipefs.mount is a disabled or a static unit, not starting it.
Processing triggers for man-db (2.10.2-1) ...
Processing triggers for libc-bin (2.35-0ubuntu3.6) ...
Then mounting the NFS share and checking that I can read the contents of that readme.txt file:
ubuntu@ubuntu:~$ sudo mount -t nfs 192.168.0.254:/clients /clients
ubuntu@ubuntu:~$ ls /clients
readme.txt
ubuntu@ubuntu:~$ cat /clients/readme.txt
Linux cluster-gateway 6.1.0-21-amd64 #1 SMP PREEMPT_DYNAMIC Debian 6.1.90-1 (2024-05-03) x86_64 GNU/Linux
Ok, so far so good, NFS is up and running. Now I “just” have to figure out how to
Next
The next steps in part 3 are to get a worker node booting into a Debian install where the filesystem is mounted on the NFS share. This requires some fiddling with the contents of the TFTP server and using the Debootstrap tool to create a suitable Debian installation filesystem.
Part 3 - PXE Booting Debian with an NFS Root Filesystem
Some more handy resources
- https://wiki.debian.org/NetworkConfiguration
- https://wiki.debian.org/DHCP_Server
- https://ubuntu.com/server/docs/how-to-install-and-configure-isc-dhcp-server
- https://wiki.debian.org/NetworkConfiguration#Setting_up_an_Ethernet_Interface
- https://deb.debian.org/debian/dists/bookworm/main/installer-amd64/current/images/netboot/
- https://wiki.debian.org/NFSServerSetup
- https://wiki.syslinux.org/wiki/index.php?title=PXELINUX#Custom_Menu_Example_with_sub-menus
- https://www.digitalocean.com/community/tutorials/how-to-set-up-an-nfs-mount-on-debian-11
Footnotes
¹ The PXE network booting process requires the TFTP server to be on the local subnet - in part because it has no security to speak of.
² *Not* the PXE boot - if you have network booting taking precedence over USB booting then the Lenovos will drop to a boot selection screen if you hit key F12 during boot