PXE Booting Debian with an NFS Root Filesystem
Jun 29, 2024
homelab
kubernetes
pxe
syslinux
pxelinux
nfsroot
debootstrap
Putting together a homelab Kubernetes cluster in my own stubborn way. I’m assuming a reader who’s basically me before I embarked on this little expedition, so I won’t go into minute detail about day-to-day Linux setup and administration - only the things that are new to me and have changed since I last encountered them.
- Part 0 - Best laid plans
- Part 1 - Installing the hardware
- Part 2 - Boot across the network
- Part 3 - PXE Booting Debian with an NFS Root Filesystem
- Part 4 - Filesystems for everybody!
- Part 5 - Getting a clean boot
- Part 6 - Kubernetes at last
Sections added as I actually proceed with this!
Init
In the previous part there’s this innocuous line where I extracted the contents of the Debian network installer
into the /srv/tftp directory and verified that PXE booting was working with that:
$ tar -xvf netboot.tar.gz
That unpacks a hierarchy of files, but the ones important to me are:
debian-installer/amd64/pxelinux.0debian-installer/amd64/boot-screens/ldlinux.c32debian-installer/amd64/pxelinux.cfg/defaultdebian-installer/amd64/linuxdebian-installer/amd64/initrd.gz
There are also three important symlinks:
pxelinux.0is linked todebian-installer/amd64/pxelinux.0ldlinux.c32is linked todebian-installer/amd64/boot-screens/ldlinux.c32pxelinux.cfg/is linked todebian-installer/amd64/pxelinux.cfg/
Looking at the root of the tftp directory:
dcminter@cluster-gateway:/srv/tftp$ ls -al
total 16
drwxr-xr-x 3 root root 4096 Jun  6 17:25 .
drwxr-xr-x 4 root root 4096 Jun 13 20:07 ..
drwxr-xr-x 3 root root 4096 Feb  5 08:43 debian-installer
lrwxrwxrwx 1 root root   47 Feb  5 08:43 ldlinux.c32 -> debian-installer/amd64/boot-screens/ldlinux.c32
lrwxrwxrwx 1 root root   33 Feb  5 08:43 pxelinux.0 -> debian-installer/amd64/pxelinux.0
lrwxrwxrwx 1 root root   35 Feb  5 08:43 pxelinux.cfg -> debian-installer/amd64/pxelinux.cfg
lrwxrwxrwx 1 root root   47 Feb  5 08:43 splash.png -> debian-installer/amd64/boot-screens//splash.png
-rw-r--r-- 1 root root   65 Feb  5 08:43 version.info
You’ll recall that in the DHCP daemon configuration I specified that the filename to load from tftp on the
booting clients was pxelinux.0 so that’s the entry point.
PXELinux is part of SysLinux and is a lightweight bootloader. The PXE flavour is mostly configured with the same flags as SysLinux, but where SysLinux was for disk based booting, PXE is expressly intended for network booting.
As soon as the firmware (i.e. the BIOS) on the client machine pulls down the pxelinux.0 binary, control is passed
to that by executing it. Via the symlink this is really sourced from the
file /srv/tftp/debian-installer/amd64/pxelinux.0 on the cluster gateway.
That in turn is rather small, and so it next pulls down additional functionality from the “code module” - the specific
version of which depends on the original bios boot mode. The c32version is the one I care about here,
hence ldlinux.c32 (the name derives from “a [32 bit] file format similar to DOS “.com”
files”)¹ - if I’d set things up to do UEFI boot
then presumably one of the *.e32 or *.e64 core module versions would have been needed. Following the symlink
again this is really the file /srv/tftp/debian-installer/amd64/boot-screens/ldlinux.c32 on the cluster gateway.
This combined binary is still a small executable not a “complete” operating system, but it can do TFTP operations
and a few other things through the host machine’s firmware. Its first step² is to download
a configuration file from pxelinux.cfg/default (/srv/tftp/pxelinux.cfg/default via the symlink) and after
this point its behaviour depends on that file’s contents. The configuration can include various menus (the
installation menu shown in the screenshot upon successful boot), and importantly with the right configuration
options it can download and then hand over control to a Linux kernel.
All this stuff is new to me by the way - I don’t think PXE Linux even existed last time I tried anything even faintly similar to this.
Anyway, when I unpacked that netboot.tar.gz file into /srv/tftp there are about 300 files in total! Can I
manage with fewer? Yes! Really all I need are:
- The boot file -
pxelinux.0 - The code module-
ldlinux.c32 - A config file -
pxelinux.cfg/default - A Linux kernel
- An init system
Here’s an illustration of what I’m aiming for:
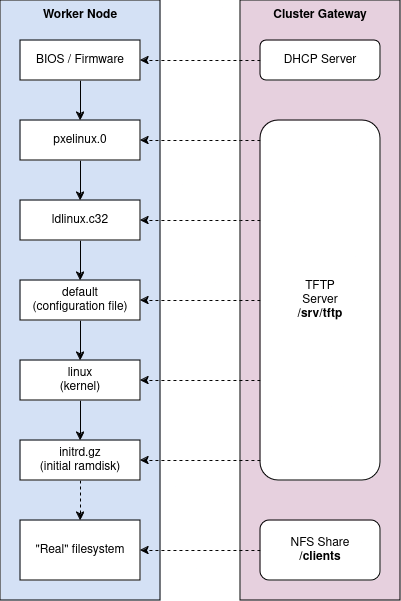
The PXE network boot sequence I'm aiming for
The minimal config I need in the pxelinux.cfg/default file specifies:
- A default label for the configuration to use
- A labelled configuration section and in that section
- The path to a Linux kernel file to load
- The path to an init image to use
- Any boot flags to pass to the kernel
Here’s the config file I ended up with:
$ cat /srv/tftp/pxelinux.cfg/default
DEFAULT linux
LABEL linux
KERNEL vmlinuz-6.1.0-21-amd64
  INITRD initrd.img-6.1.0-21-amd64
  APPEND root=/dev/nfs nfsroot=192.168.0.254:/clients,rw ip=dhcp
The KERNEL file is, well, just that - the Linux kernel, literally the thing that is Linux itself. If you’re here
reading this that probably doesn’t require more detail. However I decided that instead of using the copy supplied
in the Debian netboot distribution I would take the copy from the gateway server’s own boot initialization under
the /boot mount point. I don’t think this is strictly necessary but it seemed like a good idea to make sure that
the worker nodes and the gateway were all running exactly the same version of Linux. Anyway that’s why the
file name here is vmlinuz-6.1.0-21-amd64 instead of just linux as in the Debian netboot.
The INITRD system is waaay more interesting and again something I didn’t know about - because I’ve let various
installers hold my hand for these bits for many years now. Before those existed (in the boot & root floppy disk days)
initrd was not, as far as I remember, a thing that existed³. Anyway, what it is is this: a
compressed filesystem image that Linux first uncompresses into memory (“initrd” stands for “initial ram
disk”) and then boots into. Its job is to do any extra setup
before mounting the “real” root filesystem from a disk - or in our case from NFS - and handing over control to the
initial process within that.
On my first attempt to get things working I didn’t know this; I thought all the “Debian installer” stuff was
in those 300 or so other files in the netboot distribution. I deleted most of them, setup my config file to point to
the netboot copy of both the kernel debian-installer/amd64/kernel and initrd debian-installer/amd64/initrd.gz
swung the propellor and was rather startled to end up immediately in the same Debian installer that I thought I’d
just deleted.
Once I figured that out (by, er, reading the documentation) the solution was simple: to replace the netboot copy of
initrd.gz with the initrd system from the previously-installed cluster gateway itself. Keeping that and the kernel
aligned seemed reasonably sensible in case there was anything specific to that version that its initrd system
depended upon. Thus the INITRD file in my config points at initrd.img-6.1.0-21-amd64 and yes - this got me to the
expected next step of the kernel booting and NOT into dumping me into the Debian installer.
The APPEND line conveys the following parameters to the booting kernel:
root=/dev/nfsnfsroot=192.168.0.254:/clients,rwip=dhcp
The root parameter tells the kernel what “device” to mount as the root device. In a normal local boot this would
indicate something like a local disk. The /dev/nfs device is special, though, and actually this instructs the
initrd system to run some scripts to mount an NFS network file share and use that as the root device.
The nfsroot parameter tells the kernel (or
the initrd system) exactly what to mount - here it’s specifying the IP address 192.168.0.254 of the cluster gateway
where I already created an NFS share, the path to that at /clients , and that it should be mounted as a read &
writeable filesystem. Writeable is not what I will ultimately want, but it’s fine for just getting one of the nodes
booting initially.
Then the ip parameter value of dhcp tells the booting Linux that it should acquire its own IP address from the
DHCP server. I assume this means that it will do another handshake with the DHCP server to acquire that even though
it had to do one already to get this far! There may be a way to avoid that, but it’s not something I feel strongly
about for my setup. I’ll be leaving it that way for now.
With the original netboot discarded and only my config and boot files there, this is what’s left:
dcminter@cluster-gateway:/srv/tftp$ ls -al
total 46596
drwxr-xr-x 3 root root     4096 Jun 15 20:34 .
drwxr-xr-x 4 root root     4096 Jun 13 20:07 ..
-rw-r--r-- 1 root root 39359954 Jun 13 21:26 initrd.img-6.1.0-21-amd64
-rw-r--r-- 1 root root   119524 Jun 13 20:08 ldlinux.c32
-rw-r--r-- 1 root root    42430 Jun 13 20:08 pxelinux.0
drwxr-xr-x 2 root root     4096 Jun 15 20:34 pxelinux.cfg
-rw-r--r-- 1 root root  8169408 Jun 13 21:27 vmlinuz-6.1.0-21-amd64
Of course at this point all my NFS share has in it is still just that text file that I created in part 2…
dcminter@cluster-gateway:/clients$ ls -al
total 12
drwxr-xr-x  2 root root 4096 Jun 28 20:43 .
drwxr-xr-x 20 root root 4096 Jun 28 20:41 ..
-rw-r--r--  1 root root    6 Jun 28 20:43 readme.txt
…so if everything works ok I expect to see the Linux kernel boot, all the steps of the init system run to completion - and then it should fail at the point where it tries to run the init process (systemd) on the mounted NFS filesystem.
So the good news is that the kernel was found and started to load…
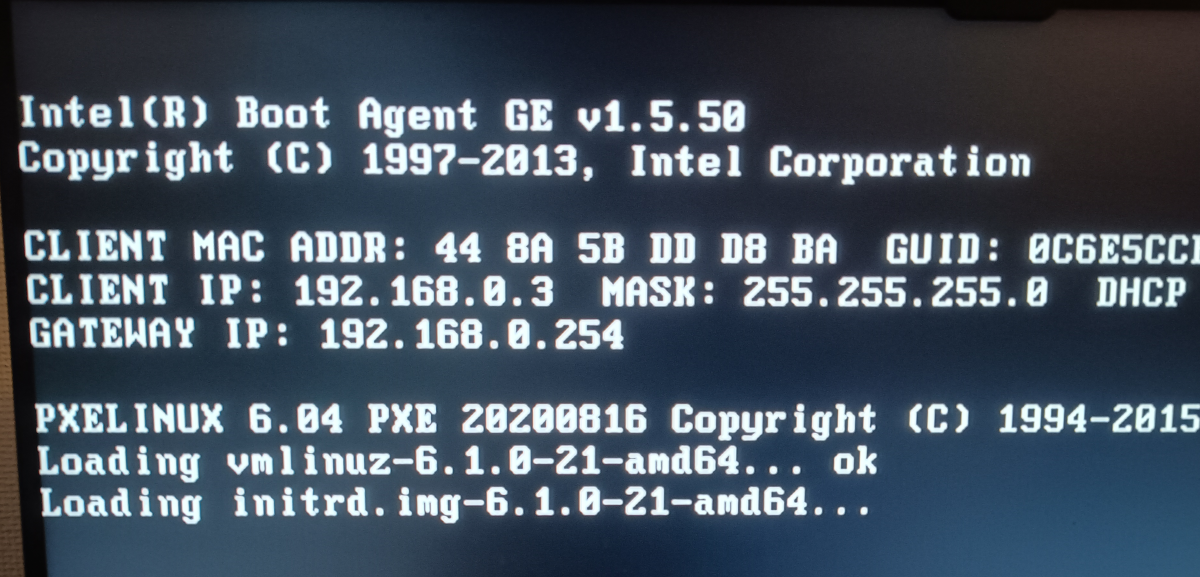
Starting to bootstrap my chosen kernel image
…and then it choked when there was no NFS filesystem to load. In fact the initial ramdisk image is set up so that if all else fails it will throw you into a busybox environment to allow you to investigate:
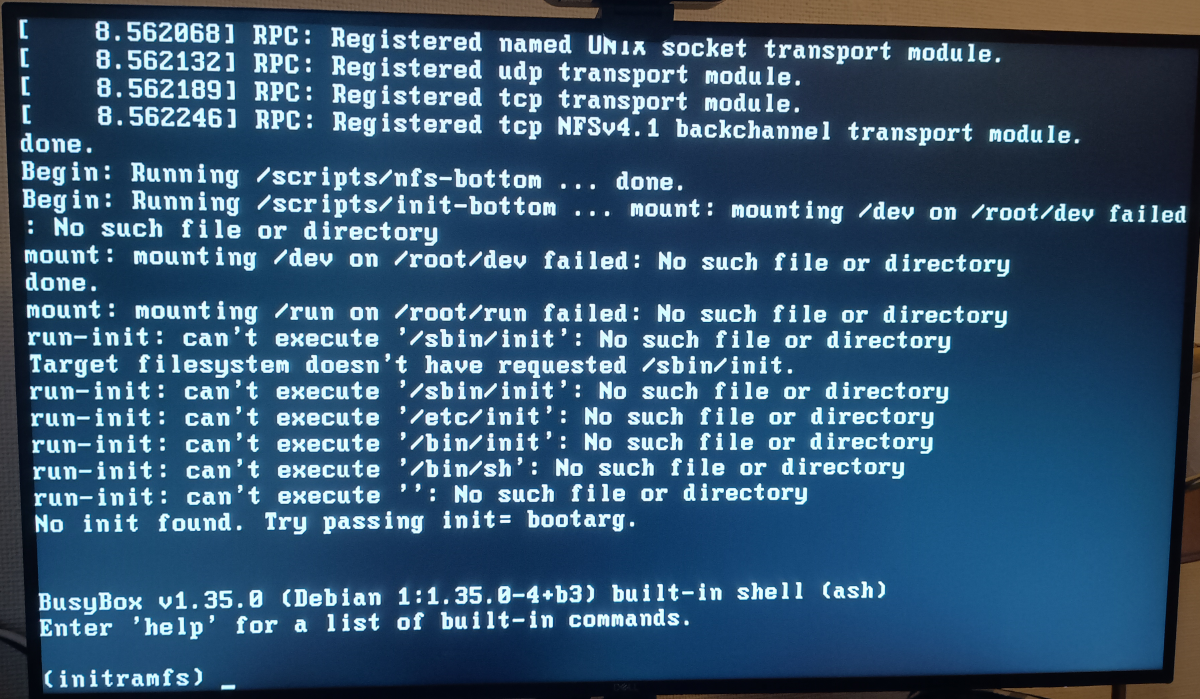
Thrown into BusyBox when no filesystem can be found
That’s exactly what I expected though, so I know why it’s failing here. Lovely. What’s next? Oh yeah, an actual Linux installation to mount on that NFS share.
Building appropriate filesystem contents with debootstrap
There are various ways I cuold have created a suitable NFS filesystem for the worker node:
- I could have unpacked a Debian Live CD
- I could have copied the cluster gateway filesystem
- I could have done a fresh install on a new machine onto a disk and copied the contents of that
- I could have done much the same but in a virtual machine and copied the contents of the virtual disk
Turns out there’s a much better way though: the debootstrap tool (the name being a portmanteaux of “Debian” and “Bootstrap”).
I actually ran the debootstrap tool from my Ubuntu laptop, roughly following the instructions from the Debian website but with a few changes (they’re a little dated).
Firstly I installed the debootstrap tooling itself:
$ sudo apt install debootstrap
Next, I create a suitable target directory and run the debootstrap command to populate it with a basic Debian distribution filesystem:
$ mkdir debian_bookworm_root
$ sudo debootstrap --arch=amd64 bookworm ./debian_bookworm_root http://deb.debian.org/debian/
W: Cannot check Release signature; keyring file not available /usr/share/keyrings/debian-archive-keyring.gpg
I: Retrieving InRelease
I: Retrieving Packages
I: Validating Packages
I: Resolving dependencies of required packages...
I: Resolving dependencies of base packages...
I: Checking component main on http://deb.debian.org/debian...
I: Retrieving adduser 3.134
I: Validating adduser 3.134
I: Retrieving apt 2.6.1
I: Validating apt 2.6.1
...
There’s then a tonne of output about retrieving, validating, extracting, unpacking, and configuring that I’ve snipped out here, until:
...
I: Configuring tasksel-data...
I: Configuring libc-bin...
I: Base system installed successfully.
Taking a look to see what I’ve created here:
$ ls -al
total 68K
drwxrwxr-x 17 dcminter dcminter 4.0K Jun 29 21:14 ./
drwxr-x--- 58 dcminter dcminter 4.0K Jun 29 21:12 ../
lrwxrwxrwx  1 root     root        7 Jun 29 21:13 bin -> usr/bin/
drwxr-xr-x  2 root     root     4.0K Mar 29 18:20 boot/
drwxr-xr-x  4 root     root     4.0K Jun 29 21:13 dev/
drwxr-xr-x 47 root     root     4.0K Jun 29 21:14 etc/
drwxr-xr-x  2 root     root     4.0K Mar 29 18:20 home/
lrwxrwxrwx  1 root     root        7 Jun 29 21:13 lib -> usr/lib/
lrwxrwxrwx  1 root     root        9 Jun 29 21:13 lib64 -> usr/lib64/
drwxr-xr-x  2 root     root     4.0K Jun 29 21:13 media/
drwxr-xr-x  2 root     root     4.0K Jun 29 21:13 mnt/
drwxr-xr-x  2 root     root     4.0K Jun 29 21:13 opt/
drwxr-xr-x  2 root     root     4.0K Mar 29 18:20 proc/
drwx------  2 root     root     4.0K Jun 29 21:13 root/
drwxr-xr-x  5 root     root     4.0K Jun 29 21:13 run/
lrwxrwxrwx  1 root     root        8 Jun 29 21:13 sbin -> usr/sbin/
drwxr-xr-x  2 root     root     4.0K Jun 29 21:13 srv/
drwxr-xr-x  2 root     root     4.0K Mar 29 18:20 sys/
drwxrwxrwt  2 root     root     4.0K Jun 29 21:13 tmp/
drwxr-xr-x 12 root     root     4.0K Jun 29 21:13 usr/
drwxr-xr-x 11 root     root     4.0K Jun 29 21:13 var/
Yep, that does look like a “real” root filesystem. Apart from the “root” folder (which is really a subdirectory of
my home directory) the folders are even owned by the root user. But some things are not quite right:
$ cat etc/hostname
kanelbulle
“Kanelbulle” … what’s up with that? That’s actually the hostname of my Ubuntu laptop - I tend to name my devices after food and that’s the Swedish for “cinnamon bun” ! But debootstrap has applied it to this distribution. Easy enough to change just by editing that file, but there’s a bigger problem:
$ ls -al home
total 8
drwxr-xr-x  2 root     root     4096 Mar 29 18:20 .
drwxrwxr-x 17 dcminter dcminter 4096 Jun 29 21:14 ..
There are no user directories! If this does boot I’m not going to be able to login to it!
Time to do some setup. The basic process is to symlink in things that are pre-requisites for Debian installers and
other setup tooling to work, then chroot into a bash shell that thinks this is the root directory. The result
is actually pretty similar to how a docker container works (though I make no attempt to hide processes or networks
from the “contained” process).
Note that in the output here I’ve manually edited the default root prompt # into a $ because the hash (pound or
octothorpe for Americans and other aliens) confuses my syntax highlighter!
$ sudo su -
$ pwd
/root
$ cd /home/dcminter/debian_bookworm_root
$ echo "proc $(pwd)/proc proc defaults 0 0" >> /etc/fstab
$ mount proc proc -t proc
$ echo "sysfs $(pwd)/sys sysfs defaults 0 0" >> /etc/fstab
$ mount sysfs sys -t sysfs
$ cp /proc/mounts etc/mtab
$ chroot $(pwd) /bin/bash
The above mounts a /proc filesystem, a /sys filesystem, and creates a plausible looking
mount table - and
finally I chroot bash into this directory structure so that I can run some tools.
Chrooted in, first I needed to check that things look as expected:
$ pwd
/
$ ls -al
total 60
drwxrwxr-x  17 1000 1000 4096 Jun 29 19:14 .
drwxrwxr-x  17 1000 1000 4096 Jun 29 19:14 ..
lrwxrwxrwx   1 root root    7 Jun 29 19:13 bin -> usr/bin
drwxr-xr-x   2 root root 4096 Mar 29 17:20 boot
drwxr-xr-x   4 root root 4096 Jun 29 19:13 dev
drwxr-xr-x  47 root root 4096 Jun 29 19:48 etc
drwxr-xr-x   2 root root 4096 Mar 29 17:20 home
lrwxrwxrwx   1 root root    7 Jun 29 19:13 lib -> usr/lib
lrwxrwxrwx   1 root root    9 Jun 29 19:13 lib64 -> usr/lib64
drwxr-xr-x   2 root root 4096 Jun 29 19:13 media
drwxr-xr-x   2 root root 4096 Jun 29 19:13 mnt
drwxr-xr-x   2 root root 4096 Jun 29 19:13 opt
dr-xr-xr-x 367 root root    0 Jun 29 19:44 proc
drwx------   2 root root 4096 Jun 29 19:13 root
drwxr-xr-x   5 root root 4096 Jun 29 19:13 run
lrwxrwxrwx   1 root root    8 Jun 29 19:13 sbin -> usr/sbin
drwxr-xr-x   2 root root 4096 Jun 29 19:13 srv
dr-xr-xr-x  13 root root    0 Jun 28 16:41 sys
drwxrwxrwt   2 root root 4096 Jun 29 19:13 tmp
drwxr-xr-x  12 root root 4096 Jun 29 19:13 usr
drwxr-xr-x  11 root root 4096 Jun 29 19:13 var
Checking pwd (path-with-directory) bash thinks we’re in the root dirctory, and checking the directory listing the output
is much as before, with two notable lines being different - the directories . and .. (i.e. the root directory
itself for both as it has no parent) are both owned by 1000 - this is the user and group id of my own dcminter
account on the host laptop. Because /etc/passwd within this chroot has no entry for that user id, however, it
just shows the number. This is all what I’m expecting, and adding a user account is one of the steps I’ll want
to take care of next though - along with several others:
- Change the default hostname to something more suitable that doesn’t clash with my laptop
- Setup a user account so that I can log into the running node
- Setup an SSH daemon so that I can log into it remotely
- Install sudo (Debian doesn’t come with it by default)
- Add the user account to the sudoers group so I can administer the running system
Step by step, set the hostname…
$ echo "worker-node" > /etc/hostname
…then setup a user account. I usually use dcminter- naturally yours will be something different. I’m using
adduser which is interactive. It gets mildly upset at the environment it finds itself in, but you can ignore that…
$ adduser dcminter
perl: warning: Setting locale failed.
perl: warning: Please check that your locale settings:
	LANGUAGE = (unset),
	LC_ALL = (unset),
	LC_ADDRESS = "en_GB.UTF-8",
	LC_NAME = "en_GB.UTF-8",
	LC_MONETARY = "en_GB.UTF-8",
	LC_PAPER = "en_GB.UTF-8",
	LC_IDENTIFICATION = "en_GB.UTF-8",
	LC_TELEPHONE = "en_GB.UTF-8",
	LC_MEASUREMENT = "en_GB.UTF-8",
	LC_TIME = "en_GB.UTF-8",
	LC_NUMERIC = "en_GB.UTF-8",
	LANG = "en_US.UTF-8"
    are supported and installed on your system.
perl: warning: Falling back to the standard locale ("C").
Adding user `dcminter' ...
Adding new group `dcminter' (1000) ...
Adding new user `dcminter' (1000) with group `dcminter (1000)' ...
Creating home directory `/home/dcminter' ...
Copying files from `/etc/skel' ...
New password:
Retype new password:
passwd: password updated successfully
Changing the user information for dcminter
Enter the new value, or press ENTER for the default
	Full Name []: Dave Minter
	Room Number []:
	Work Phone []:
	Home Phone []:
	Other []:
Is the information correct? [Y/n] Y
Adding new user `dcminter' to supplemental / extra groups `users' ...
Adding user `dcminter' to group `users' ...
Now the /home directory has a user directory in it with basic shell init files.
$ find /home
home
home/dcminter
home/dcminter/.bashrc
home/dcminter/.profile
home/dcminter/.bash_logout
Incidentally, the “human” user ids usually start from 1000 and this is the first such account, so now there is an
entry for 1000 in the /etc/passwd file, and so when I list the contents of the root directory again the . and ..
directories are owned by dcminter instead of 1000
$ ls -al /
total 60
drwxrwxr-x  17 dcminter dcminter 4096 Jun 29 19:14 .
drwxrwxr-x  17 dcminter dcminter 4096 Jun 29 19:14 ..
lrwxrwxrwx   1 root     root        7 Jun 29 19:13 bin -> usr/bin
... etc.
Next I install the SSH daemon and then sudo …
$ apt install openssh-server
Reading package lists... Done
... etc.

$ apt install sudo
Reading package lists... Done
... etc.
… and then I check that the sudo group exists and add my user account to those entitled to sudo:
$ grep sudo /etc/group
sudo:x:27:
$ usermod -a -G sudo dcminter
$ grep sudo /etc/group
sudo:x:27:dcminter
$ exit
Wrapping up that chroot session I exit bash and that returns me to a normal bash shell on my laptop. There are a few
more things to do:
- Remove those temporary mounts from my laptop
- Change the ownership of the filesystem from
dcmintertoroot - Zip up (actually
tarandgzip) the filesystem - Transfer it to the cluster gateway
- Unpack the filesystem into the nfs
clientshare - Cross fingers and try booting, logging in, and so on
So, zapping those mounts. That’s simple enough. Use sudo to run vi or some other simple editor on /etc/fstab
and remove the proc /home/... and sysfs /home/... lines that I added to the end of it with those echo commands
earlier. Then explicitly unmount them as follows (or just reboot):
$ pwd
/home/dcminter/debian_bookworm_root
$ sudo umount proc
$ sudo umount sys
Also remove the fake mtab - that’s going to get created by the kernel from the real mounts on the running node when it’s successuflly booted.
$ pwd
/home/dcminter/debian_bookworm_root
$ rm etc/mtab
I change the ownership & group of the directory to root:
$ pwd
/home/dcminter/debian_bookworm_root
$ chown dcminter .
$ chgrp dcminter .
And tar & gzip it up, and change the owner of that file to my own user so I can move it around without needing sudo.
$ sudo tar -cvf ../worker_node.tar .
$ sudo gzip ../worker_node.tar
$ sudo chown dcminter ../worker_node.tar.gz
$ sudo chgrp dcminter ../worker_node.tar.gz
$ cd ..
$ ls -al worker_node.tar.gz
-rw-r--r-- 1 root root 194333884 Jun 29 22:52 worker_node.tar.gz
I used sftp to transfer it over to the cluster gateway…
$ sftp cluster-gateway.paperstack.com
Connected to cluster-gateway.paperstack.com.
sftp> put worker_node.tar.gz
Uploading worker_node.tar.gz to /home/dcminter/worker_node.tar.gz
worker_node.tar.gz                                                                                                                                                               100%  185MB  40.5MB/s   00:04
sftp> exit
You’ll note that at some point between part 2 and part 3 I had added my public ssh key into the authorized_keys file
in my login account there, so I’m not prompted for a password by sftp or ssh. I won’t walk through all of the details
of that, but I actually I did the same by manually copying in a home/dcminter/.ssh/authorized_keys file from
the host laptop to the debootstrap directory before packing it all up.
Over on the cluster gateway I uncompress the transferred archive, remove that readme file, and then untar
the archive into the /clients directory:
dcminter@cluster-gateway:~$ gzip -d worker_node.tar.gz
dcminter@cluster-gateway:/clients$ cd /clients
dcminter@cluster-gateway:/clients$ sudo rm readme.txt
dcminter@cluster-gateway:/clients$ sudo tar -xvf ~/worker_node.tar
Ok, next steps, boot that worker node machine again and do I make it all the way to a Linux prompt… and can I login?

Triumphantly booted and logged into NFS mounted Debian Linux
Just as importantly, I can login over the network (I check the DHCPD logs on the cluster gateway to discover the booted machine’s IP address):
$ ssh 192.168.0.3
The authenticity of host '192.168.0.3 (192.168.0.3)' can't be established.
ED25519 key fingerprint is SHA256:yTsXceFOcRUAm6l2Z6Qje9TBUIUZNZaSgMR9yWcoCUg.
This key is not known by any other names
Are you sure you want to continue connecting (yes/no/[fingerprint])? yes
Warning: Permanently added '192.168.0.3' (ED25519) to the list of known hosts.
dcminter@192.168.0.3's password:
Linux worker-node 6.1.0-21-amd64 #1 SMP PREEMPT_DYNAMIC Debian 6.1.90-1 (2024-05-03) x86_64

The programs included with the Debian GNU/Linux system are free software;
the exact distribution terms for each program are described in the
individual files in /usr/share/doc/*/copyright.

Debian GNU/Linux comes with ABSOLUTELY NO WARRANTY, to the extent
permitted by applicable law.
Last login: Sat Jun 29 21:18:06 2024
It’s worth pointing out that at this point any other setup and configuration changes done while logged into this worker
node will be written to the cluster gateway’s /clients NFS shared directory, so if I wanted I could do any additional
general set up and configuration here before I figure out how to get multiple machines booting from the same NFS
directory without breaking the world.
Next
Ok, well, that was exciting, but if I were to boot up another worker node at the same time then both of them would be sharing the same writeable root filesystem. That would not end well. So the next steps are to figure out how to mount most of the filesystem read-only, and then how to make each booting instance use a different path on the NFS server for its writeable files.
Part 4 - Filesystems for everybody!
Footnotes
¹ In the ancient times when MS DOS ruled the PC universe, there were two kinds of executable - *.EXE
files and *.COM files. The EXE file could use the whole of the addressable memory (nominally a maximum
640k although in practice tricks were available to raise this to 1M). COM files, however, were confined to 64K - but
they could be used to launch other EXE or COM files. The were also incredibly simple - essentially the file would
just be copied into memory and the program counter pointed at byte zero of whatever was copied. The IBM PC had a
16bit processor with an 8 bit data bus (the Intel 8088) but clones and genuine IBM machines rapidly appeared with
8086 and 80286 (fully 16 bit) busses. So a COM32 (or here a *.c32 file is presumably one that has a
similar super-simple format but contains 32bit x86 code. Our running Linux kernel is a 64 bit one, but all "PC"
machines are pretty much back-compatible to those 8088 processors and up, so running a 32 bit binary to launch a
64 bit kernel is absolutely no problem.
² Actually this is a lie, it tries a bunch of other filenames first, but if it doesn't find those then it default to, well, default ! I'll get back to this in the next part.
³ As far as I remember the typical boot process went thus: The LILO bootloader (a tiny binary that fitted
into the 512 byte boot record) loaded up the kernel image into memory and passed it the kernel boot parameters
that pointed directly to the physical device that contained the root filesystem and the init process that
kicked all the rest of the user-space stuff off. If you had a boot/root disk floppy boot then LILO gave you a chance
to remove the boot (kernel) floppy and replace it with the root (filesystem) floppy just before attempting to
start init